Pair a device PRO APP
Pairing connects one installed app to your website for one cashier. The administrator adds the device on the site and gets a one-time code (and a QR code); the cashier types the code into the app (or scans the QR on Android). From then on the app sells as that cashier, at the chosen location(s), and uses one POS device seat of your license. This page also covers seats, editing locations, new codes, revoking and deleting devices.
Who can do it#
The POS Apps screen is open to administrators, users with full StoreCashier access and staff with the Settings → Manage settings permission. Others see “You are not allowed to manage POS app devices.” The cashier list offers administrators, StoreCashier and WooCommerce managers, and POS staff who have the Use POS permission.
Step 1 — Add the device on the site#
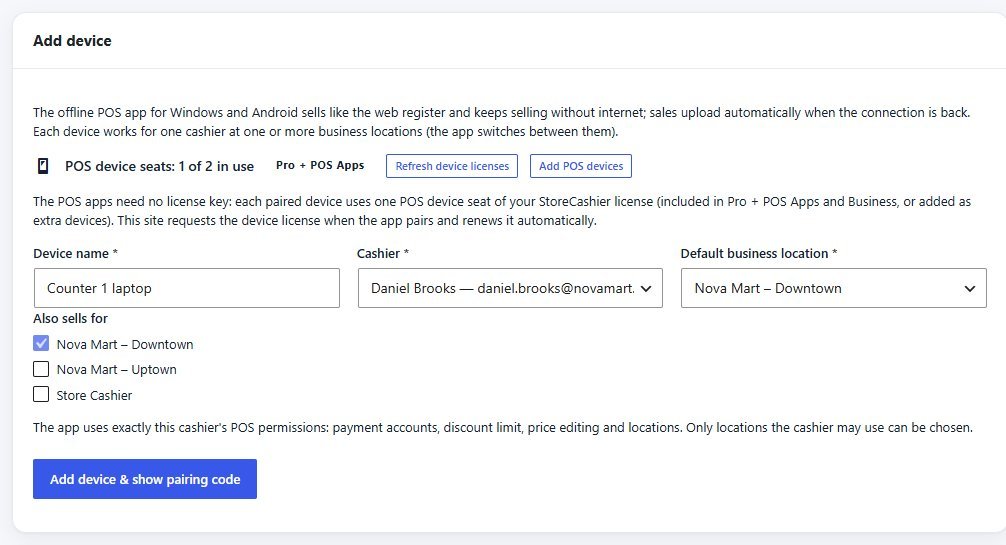
| Field | What it does | Example / default |
|---|---|---|
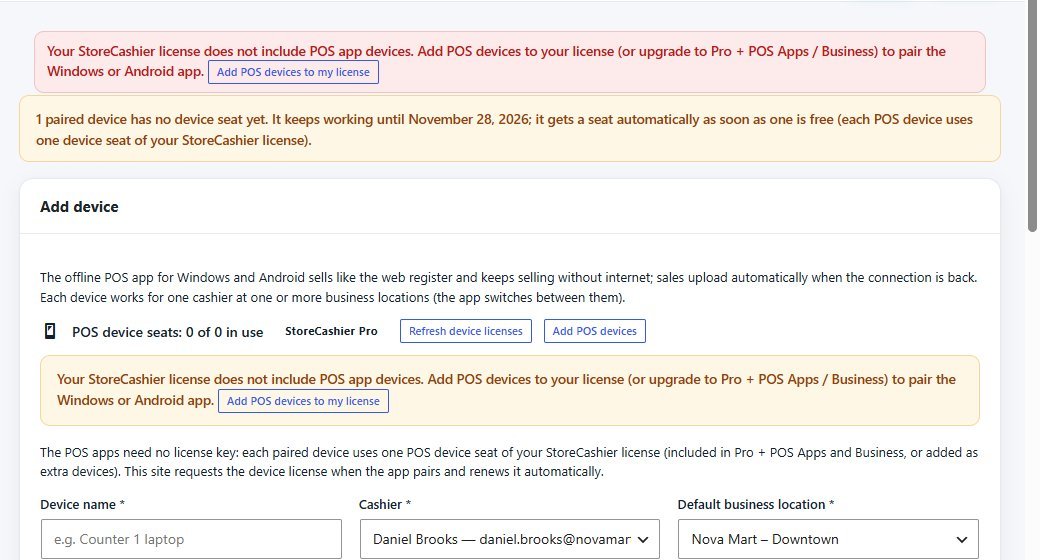
| POS device seats: x of y in use | Seats of your StoreCashier license that are taken by paired devices, and the total your package allows (Pro 0, Pro + POS Apps 2, Business 5, plus extra-device add-ons). The badge shows the package. | 1 of 2 in use · Pro + POS Apps |
| Refresh device licenses | Asks the license server for the current seat usage and renews the device license of every paired device now (normally this happens by itself weekly). | — |
| Add POS devices | Opens your account page to buy extra POS device seats. | — |
| Device name * | Name shown on the site (devices list, sync issues) and in the app header. Use the counter or machine name. The name typed here wins over the name typed in the app. | Counter 1 laptop |
| Cashier * | The WordPress user the app sells as. The app uses exactly this user’s POS permissions: payment accounts, maximum discount, price editing, holds, returns, register, Mobile Plans permissions and allowed locations. Cannot be changed later — add a new device for another cashier. | Daniel Brooks |
| Default business location * | The location the app sells for when it starts. Only locations the chosen cashier may use can be selected. | Nova Mart – Downtown |
| Also sells for | Extra locations this device may switch to (shown when you have more than one location). The default location is always ticked. See Several locations on one device. | Nova Mart – Uptown |
| Add device & show pairing code | Creates the device (status Waiting for pairing) and shows the pairing code once. | — |
The pairing code and QR code#
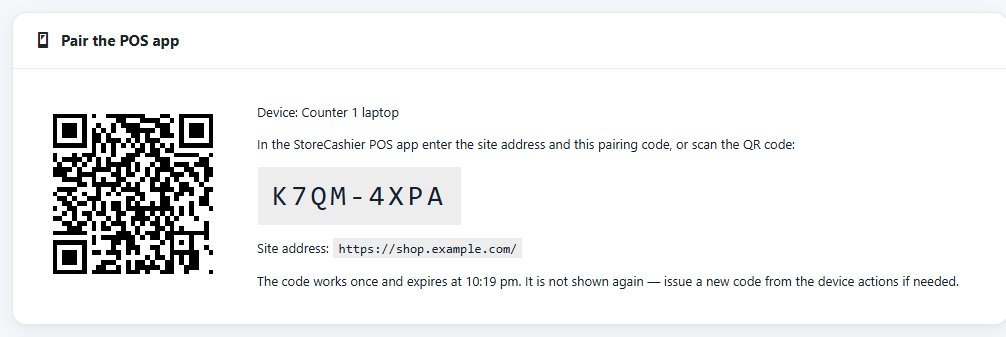
- Code — 8 characters, shown as
ABCD-EFGH. Upper / lower case, spaces and the dash do not matter when typing it. - Valid 15 minutes and once. It is not shown again; if it expired or got lost, use New pairing code in the device’s actions.
- QR code — contains the site address and the code, for the Android app’s Scan QR code button.
- Site address — what to type in the app (your home URL).
Step 2 — Pair in the app#
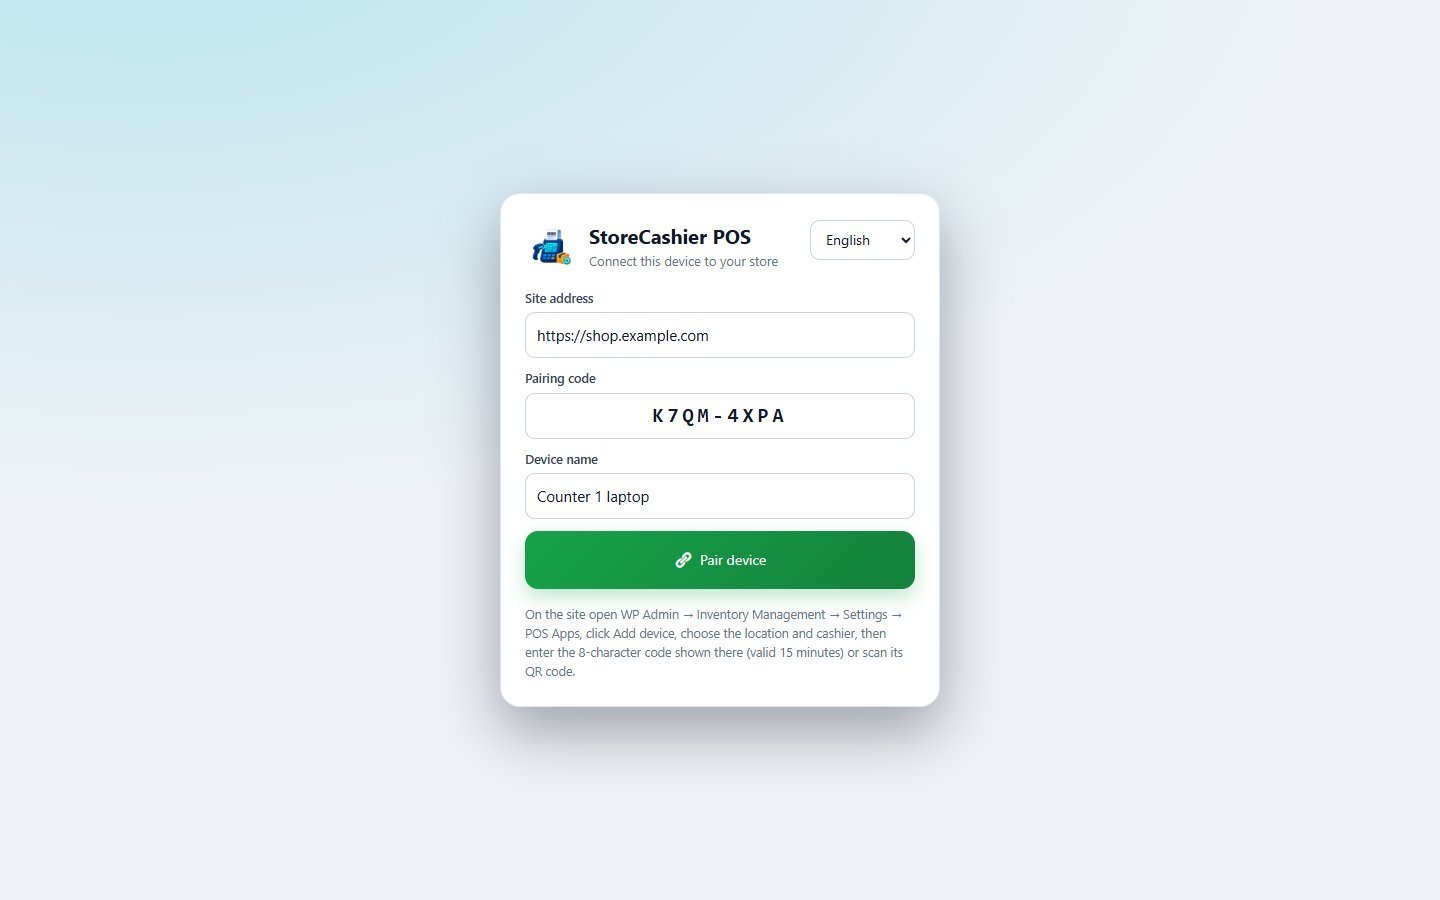
- Choose the language at the top right (English or বাংলা) — it can be changed later in Settings.
- Site address: your shop address, e.g.
https://shop.example.com. It must be HTTPS (local development addresses are the only exception). - Pairing code: the 8 characters from the site.
- Device name: pre-filled with “Windows POS” / “Android POS”. Only used when the admin left the name empty.
- Tap Pair device. On Android you can instead tap Scan QR code and point the camera at the QR on the POS Apps screen — the site and code are filled in for you.
- The app shows “Downloading products, customers and settings…”, then opens the register. It is ready to sell, also offline.
Behind the scenes the app sends the code with its stable device id; the site checks that a seat is free, gets a signed device license (certificate) for this device from the license server, gives the app a secret access token and the device license, and marks the device Active. The token is stored encrypted on the device.
Pairing messages#
| Message in the app | Meaning | Fix |
|---|---|---|
| This pairing code is invalid or expired. | Wrong code, already used, or older than 15 minutes. | Site: device actions → New pairing code. |
| Your plan's POS device seats are all in use — ask the shop admin to add devices or release an old one. | Every seat is taken. | Revoke / delete a device you no longer use, or buy an extra device. The code stays valid — try again with the same code. |
| Your shop's StoreCashier plan does not include POS app devices… | The license is the plain Pro package (0 devices). | Upgrade to Pro + POS Apps / Business or add extra devices. |
| The shop's website could not get a device license from the StoreCashier license server right now… | The site could not reach the license server, or the license is suspended / expired. | Wait a few minutes and try again with the same code; check the license in StoreCashier Pro. |
| Too many attempts | 10 failed pairing attempts from the same network within 15 minutes. | Wait 15 minutes. |
| The server cannot be reached / HTTPS required | Wrong address, no internet, or http://. | Check the address, use https://. |
On the site, adding a device while all seats are used shows the same warning before any code is issued:
Step 3 — Manage devices#
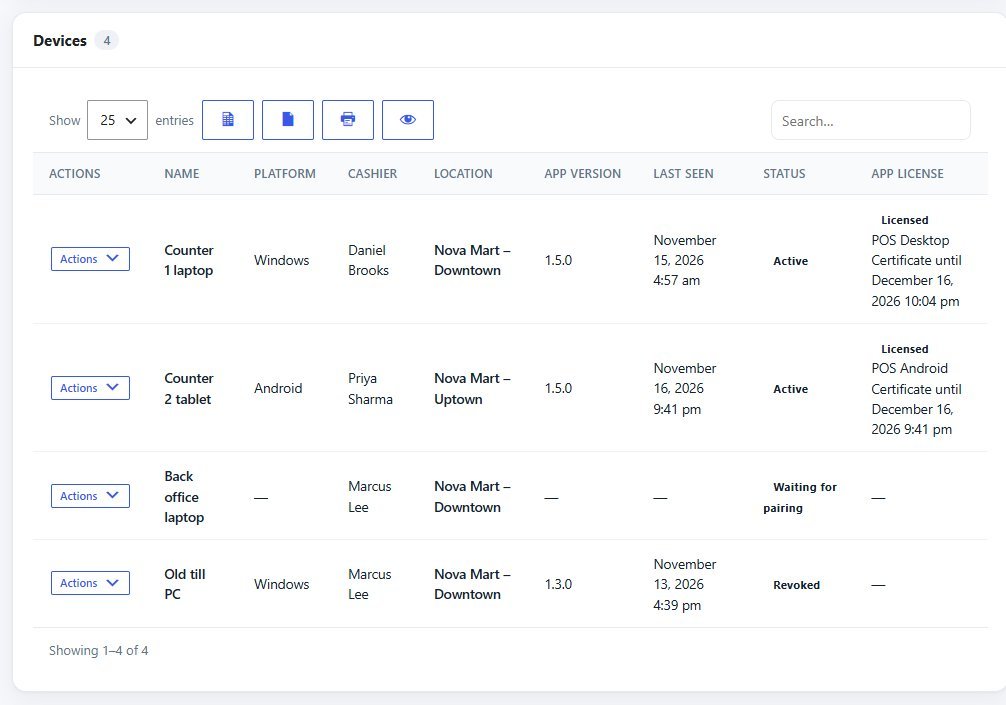
| Column | What it shows |
|---|---|
| Name / Platform / Cashier | Device name, Windows or Android (filled after pairing), the WordPress user it sells as. |
| Location | Default location in bold, then the other locations (“first = default”). |
| App version / Last seen | Reported by the app on every request — useful to see who still runs an old version or has been offline for long. |
| Status | Waiting for pairing (code issued, not used yet) · Active (paired) · Revoked (locked, must be paired again). |
| App license | The device license state: Licensed, Offline grace, Device seat needed soon, License expired, Seat released, No device seat, No free device seat, Not checked. Explained in Device license. |
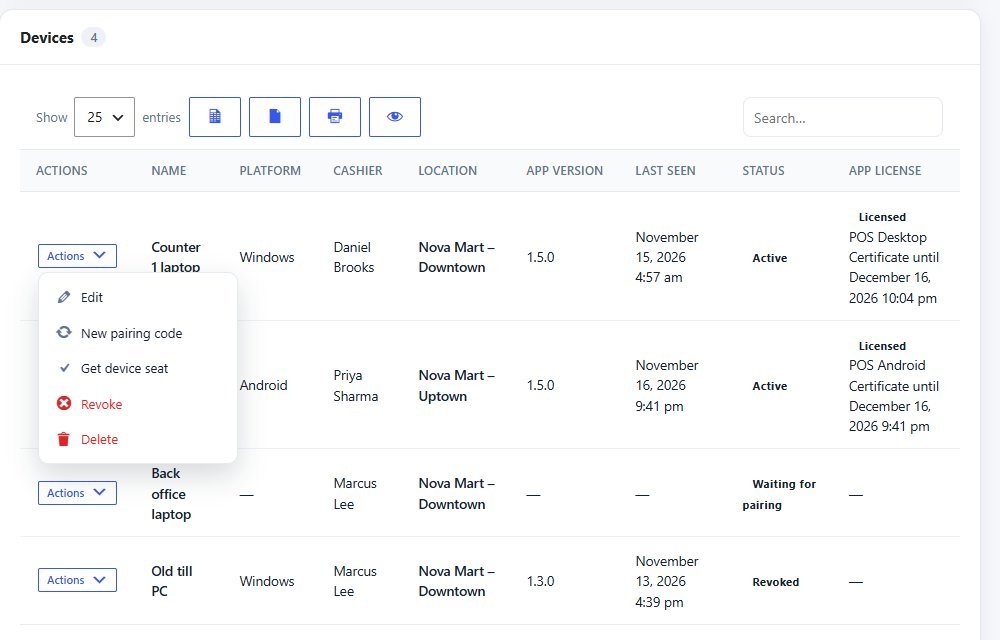
| Action | What happens |
|---|---|
| Edit | Change the name, the default location and the other locations (the cashier is fixed). The app picks up the change at its next sync. Sales already queued for a location you remove are refused at upload and appear in Sync issues. |
| New pairing code | Issues a fresh 15-minute code for this device — for a first pairing that expired, or to re-pair the same device (e.g. after “Pair again”). Re-pairing the same installation keeps its seat and its unsynced sales. |
| Get device seat | Shown when an active device has no valid seat (missing, released, expired, or a device paired before Pro 1.5.6). Requests a seat and a device license now; the app receives it at its next sync. |
| Revoke | Locks the app at once (it asks for a new code), and frees its seat. Sales not yet uploaded stay on the device and upload after it is paired again. Use it for a lost or replaced device. |
| Delete | Removes the device row and frees its seat. Sales it already uploaded are kept on the site. |

Pairing again#
The app shows the pairing screen again when the device was revoked, when its token is no longer valid, or when you press Pair again on a license banner. In that mode the site address is fixed and the screen says “Sales saved on this device are kept and will upload after pairing.” Get a new code from the device’s actions and enter it. Use a different site (erases local data) is only for moving the device to another shop — it warns how many unsynced sales would be lost.
To retire a device yourself: app Settings → Log out & unpair this device. This is blocked while sales are waiting to sync, removes the token and all local data, and you should also revoke the device on the site.
Does the same PC need a new seat after reinstalling?
No. The app keeps a stable device id; pairing the same installation again re-uses its seat. A fresh Windows user profile or a new tablet counts as a new device.
Can I pair before the cashier user exists?
No. Create the user first (Store Staff) and give them POS permission and the right locations, then add the device.
The device shows “Waiting for pairing” for days.
The code was never used. Use New pairing code when you are at the device, or delete the row.