Welcome to SmartStock 👋
A complete Inventory & Point-of-Sale (POS) management suite that turns your WordPress + WooCommerce store into a full business operations system — Contacts, Products, Purchases, POS Sales, Stock, Expenses, Accounting & Reports.
What you get
Touch POS
Full‑screen register that creates real WooCommerce orders, multi‑cart, discounts, coupons, multi‑account payments & instant invoice print.
Inventory Ledger
Per‑product, per‑variation, per‑location stock with a full movement history — synced to WooCommerce automatically.
Purchases & Returns
Record supplier purchases, payments, and returns with correct stock & ledger effects.
Accounting
Payment accounts, balance sheet, trial balance and cash‑flow — every sale, purchase and expense posts automatically.
Staff & Roles
Grant granular access, scope cashiers to specific locations and payment accounts.
12+ Reports
Profit/Loss, stock, sales rep, product sell, payments, trending products and more.
Requirements
| Item | Minimum | Recommended |
|---|---|---|
| WordPress | 6.0+ | Latest |
| WooCommerce | 7.0+ | Latest |
| PHP | 7.4+ | 8.1+ |
| MySQL / MariaDB | 5.7 / 10.3 | Latest |
Installation
Two easy ways to install — from the WordPress admin, or by FTP.
Method 1 — WordPress admin (recommended)
- Download the plugin ZIP (
smartstock.zip) from your CodeCanyon Downloads (choose “Installable WordPress file only”). - Go to WordPress Admin → Plugins → Add New → Upload Plugin.
- Choose the ZIP, click Install Now, then Activate.
- Make sure WooCommerce is installed & active (a notice will guide you if not).
- You’ll see a new Inventory Management menu in the sidebar. 🎉
Method 2 — FTP
- Unzip
smartstock.zip→ you get asmartstockfolder. - Upload it to
/wp-content/plugins/. - Go to Plugins and click Activate on “SmartStock – Inventory & POS Management”.
Quick Start — first 10 minutes
Follow this order once and your store is ready to sell.
- Business info — go to Settings → Business & General and set your business name, address, phone, currency & VAT number (used on invoices).
- Locations — add at least one Business Location (Settings → Business Locations). Stock is tracked per location.
- Payment accounts — add a Cash / Bank account under Accounting → List Accounts.
- Products — create WooCommerce products (Products → Add Product). SKU & barcode auto‑generate if left blank.
- Opening stock — set current quantities per location under Products → Opening Stock.
- Sell! — open Sales & POS → POS and make your first sale.
Dashboard Overview
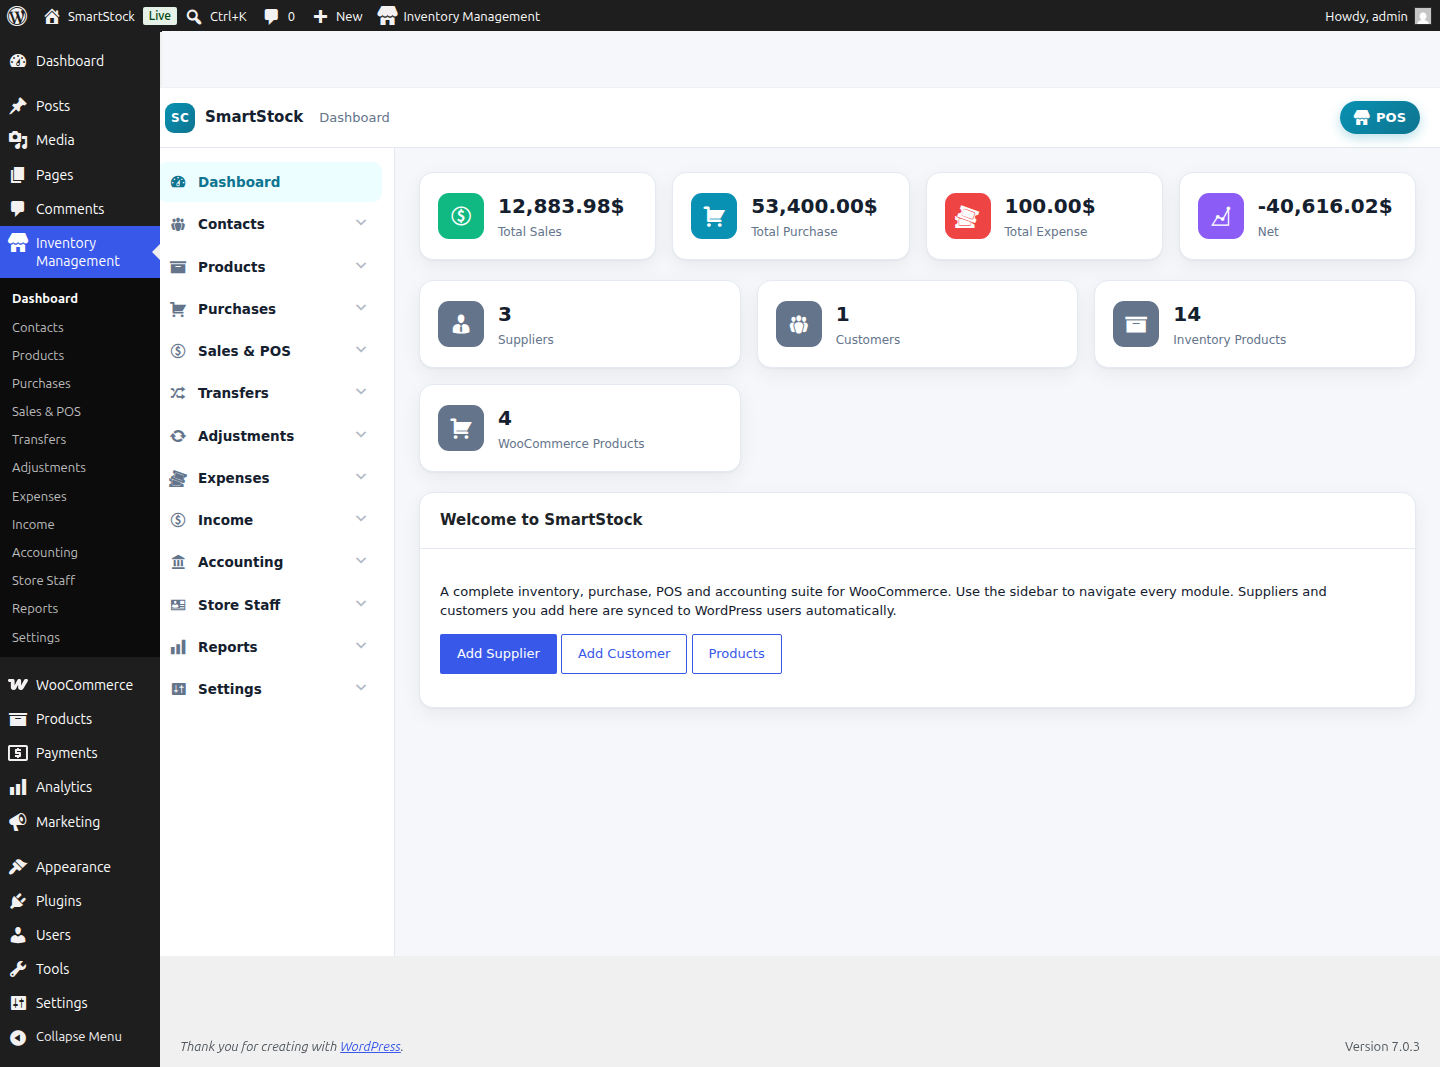
Your business at a glance — the first screen after opening Inventory Management.
 1
2
3
4
1
2
3
4
- 1 Top navigation bar — brand mark, breadcrumb of the current screen.
- 2 App sidebar — every module (Contacts, Products, Purchases, Sales & POS, Transfers, Adjustments, Expenses, Income, Accounting, Store Staff, Reports, Settings).
- 3 KPI cards — Total Sales, Total Purchase, Total Expense, Suppliers, Customers, Inventory Products & WooCommerce Products, calculated live.
- 4 POS button — jumps straight into the full‑screen register from anywhere.
The dashboard reads directly from your WooCommerce orders and the SmartStock ledgers, so the numbers always match your reports.
Contacts — Suppliers & Customers
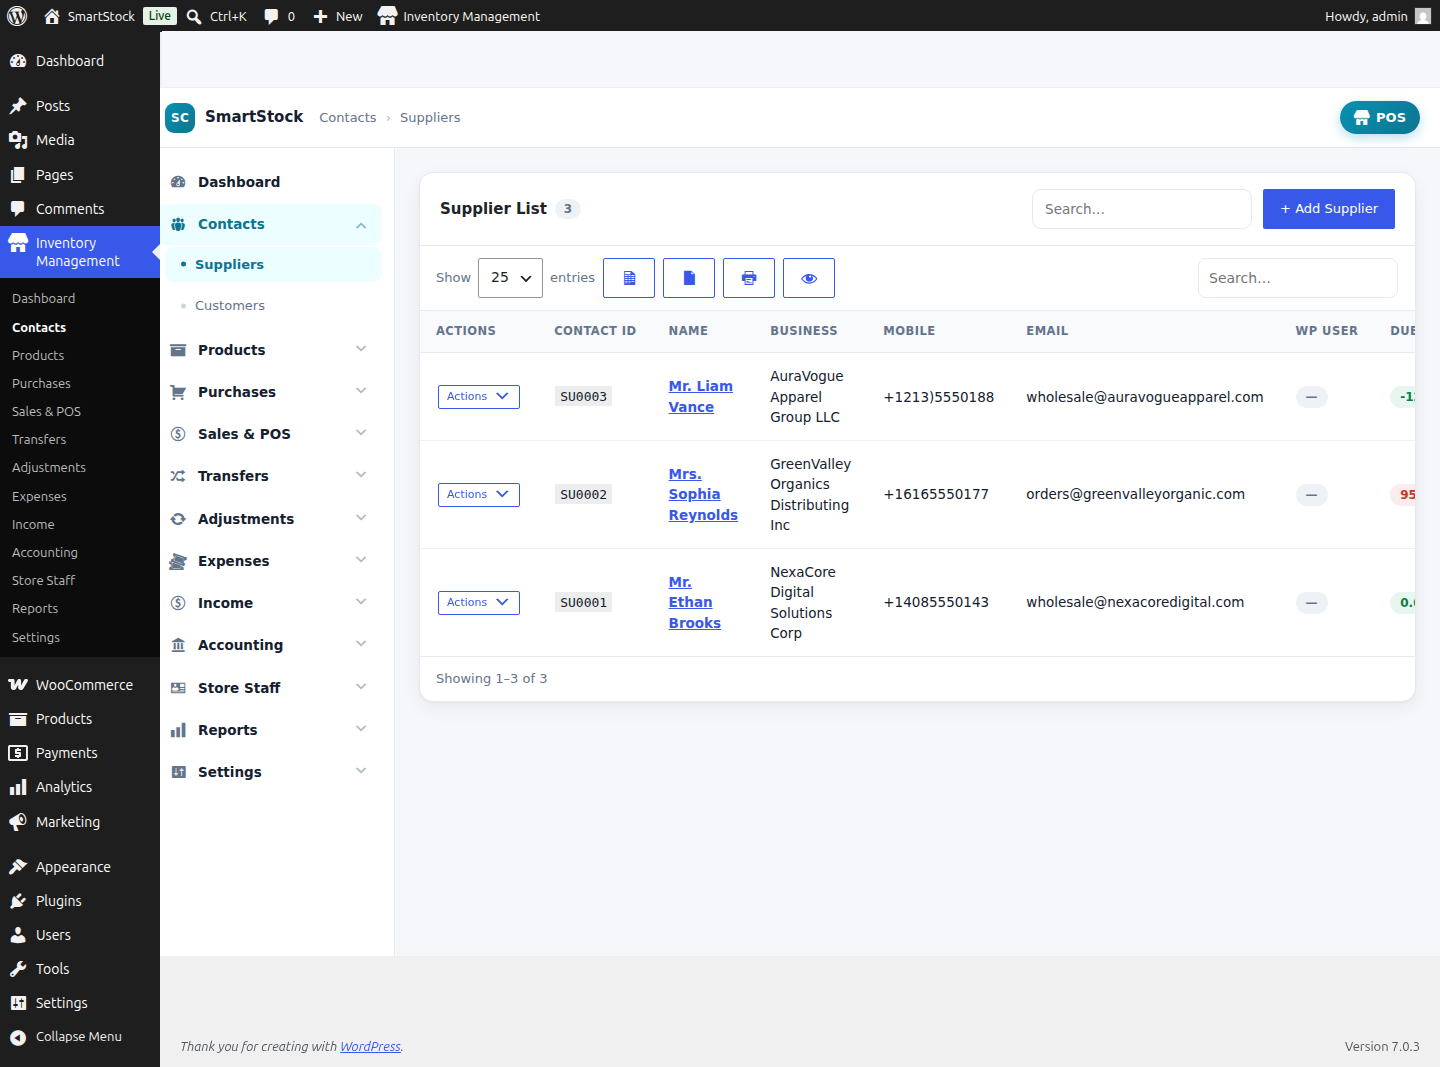
A single place for everyone you buy from and sell to, each with a running financial ledger.
Two contact types
| Type | Used in | Tracks |
|---|---|---|
| Suppliers | Purchases & purchase returns | What you owe / paid to each supplier. |
| Customers | Sales / POS & sell returns | What each customer owes (due) & their history. |
List columns & buttons
- Search — filter by name, phone or contact ID.
- Due Balance — the customer/supplier’s current outstanding amount.
- Actions ▾ — View Profile, Pay, Statement (PDF/Print), Edit, Delete.
Add or Edit a Contact
Click Add Customer / Add Supplier and fill the form:
- Name (required), Mobile, Email, Address.
- Opening balance — a starting due, if the contact already owed you (or you owed them) before using SmartStock.
- Customers are also mirrored into WooCommerce customers when they have an email, so online + offline history unifies.
Ledger, Pay & Statement
View Profile
Opens the contact’s complete history: profile details, totals (sold / paid / due), a list of every sale & purchase (each reference links to the order/invoice), and a payment history.
Pay
Record a payment against the contact. The amount is allocated FIFO (oldest unpaid invoice first); any leftover becomes an advance. Choose the payment account the money goes into — it posts to your ledger automatically.
Statement (PDF / Print)
Generates a printable A4 statement of the contact’s account for a period — hand it to the customer or supplier.
All Products
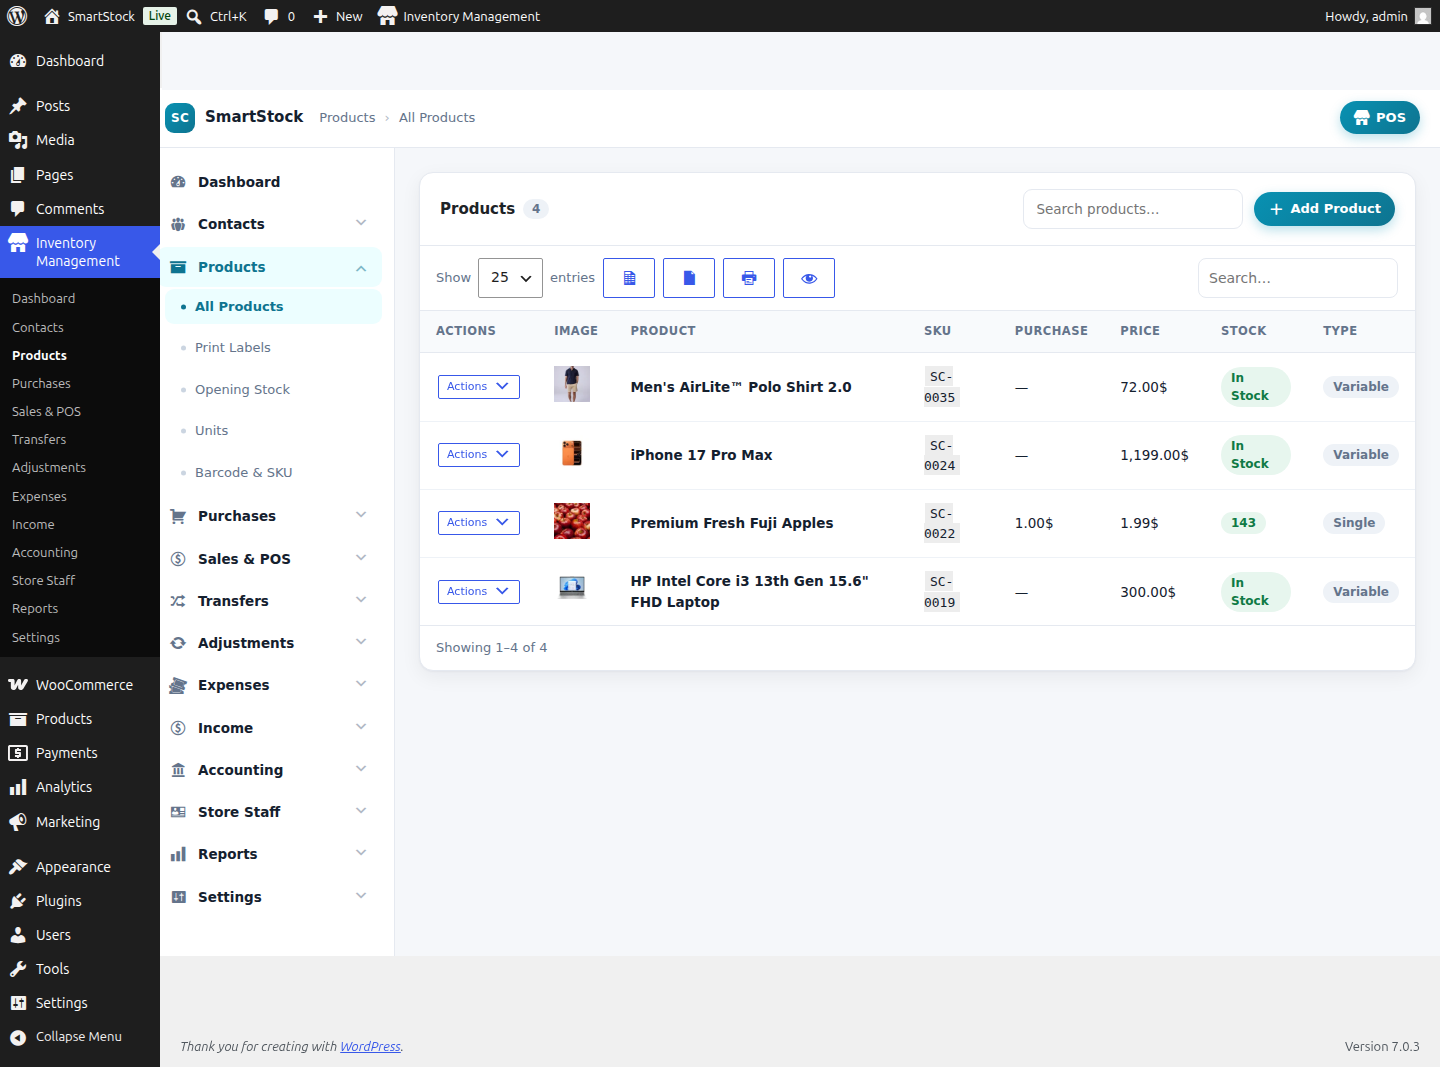
Your catalogue — these are your WooCommerce products, enriched with SmartStock stock & POS data.
 1
2
3
4
1
2
3
4
- 1 Add Product — opens the WooCommerce product editor (with the SmartStock inventory panel).
- 2 Toolbar — “Show N entries”, export to CSV / Excel, Print, and column‑visibility, plus a live search.
- 3 Actions ▾ — Print Labels, View, Edit, Add/Edit Opening Stock, Product Stock History, Delete.
- 4 Stock column — total quantity from the SmartStock ledger (or an In Stock badge when stock management is off).
Add a Product (WooCommerce)
SmartStock does not keep a separate product table — it uses WooCommerce products, so you get variations, categories, images and pricing for free. When you add/edit a product you’ll find extra SmartStock fields:
Inventory tab additions
- Barcode — placed right under the SKU. Leave blank to auto‑generate.
- Barcode Type — Code 128 / Code 39 / EAN‑13 / EAN‑8 / UPC‑A (for label printing).
- Unit — the selling unit (defaults to Pieces).
- Business Locations — which locations stock & sell this product (new products default to all).
- Default Purchase Price — sits next to Regular/Sale price (for simple products & each variation) and pre‑fills purchase forms.
Opening Stock
Set your current quantities the day you start using SmartStock — per business location and per variation — so the ledger begins from a true baseline.
Open it from the product list → Actions ▾ → Add / edit opening stock, or the Opening Stock button on the product. The screen builds one row per simple product or per variation, with a quantity box for each business location and a single unit‑cost box.
| Column | What it does | Default |
|---|---|---|
| Product / Variation | The item the row belongs to. Variable products list every variation on its own row. | — |
| SKU | The product/variation SKU, for quick identification. | — |
| [Location columns] | One quantity box per business location. Type the stock you physically hold at each location; leave blank for zero. | blank |
| Unit Cost (Before Tax) | The buying cost used to value this opening stock (feeds Stock valuation, Profit/Loss and the Balance Sheet). The first time, it is pre‑filled from the product/variation's default Purchase price — and stays fully editable. | Default purchase price |
On save, SmartStock writes one opening movement per location into the append‑only ledger and syncs the combined total back to the WooCommerce stock quantity. Re‑opening the screen shows your saved figures, so you can correct them any time.
Product Stock History
A complete, append‑only audit trail for any product or variation — every movement, in order, with a running balance you can trust.
Open it from the product list → Actions ▾ → Product Stock History. A summary panel at the top totals each movement kind, and the table below lists every individual move:
| Column | What it shows |
|---|---|
| Type | The movement kind — Opening Stock, Purchase, Purchase Return, Sale, Sell Return, Transfer In, Transfer Out, Adjustment. |
| Date | When the movement was recorded. |
| Reference | The source document number (invoice, purchase ref, transfer ref…), linking the move back to its transaction. |
| Quantity change | The signed in/out amount (+ added, − removed). |
| New Quantity | The running balance after that movement, so you can reconcile stock at any point in time. |
Use the location and variation filters to narrow the view — e.g. the exact history of one variation at one warehouse.
Units
Define the measuring/selling units your catalogue uses — Pieces, Kg, Litre, Box, Dozen, Metre and so on.
Open Products → Units. Add a unit with a name (e.g. Kilogram) and a short code (e.g. Kg) shown on invoices and lists. Existing units can be edited or deleted at any time. Assign a unit to a product from the Unit field on the product editor's Inventory tab; new products default to Pieces (or the default unit set in Settings → Products & Stock).
Barcode & SKU
Bulk‑manage codes across all products:
- Bulk generate SKUs — fills a unique SKU on every product/variation missing one (respects the prefix & minimum length).
- Bulk generate Barcodes — same for barcodes.
- Inline editing — click a code to edit & auto‑save.
Print Labels
Design & print barcode labels for shelves & products. Search products, pick what to show (name, price, business name, variation, packing date), choose a barcode source, and select a label sheet preset (20/30/32/40/50 per sheet or a roll). A live preview opens for printing. Barcodes are drawn locally (self‑contained Code 128) — no internet needed.
All Purchases
Every stock‑in from your suppliers, with payment status and per‑row actions.
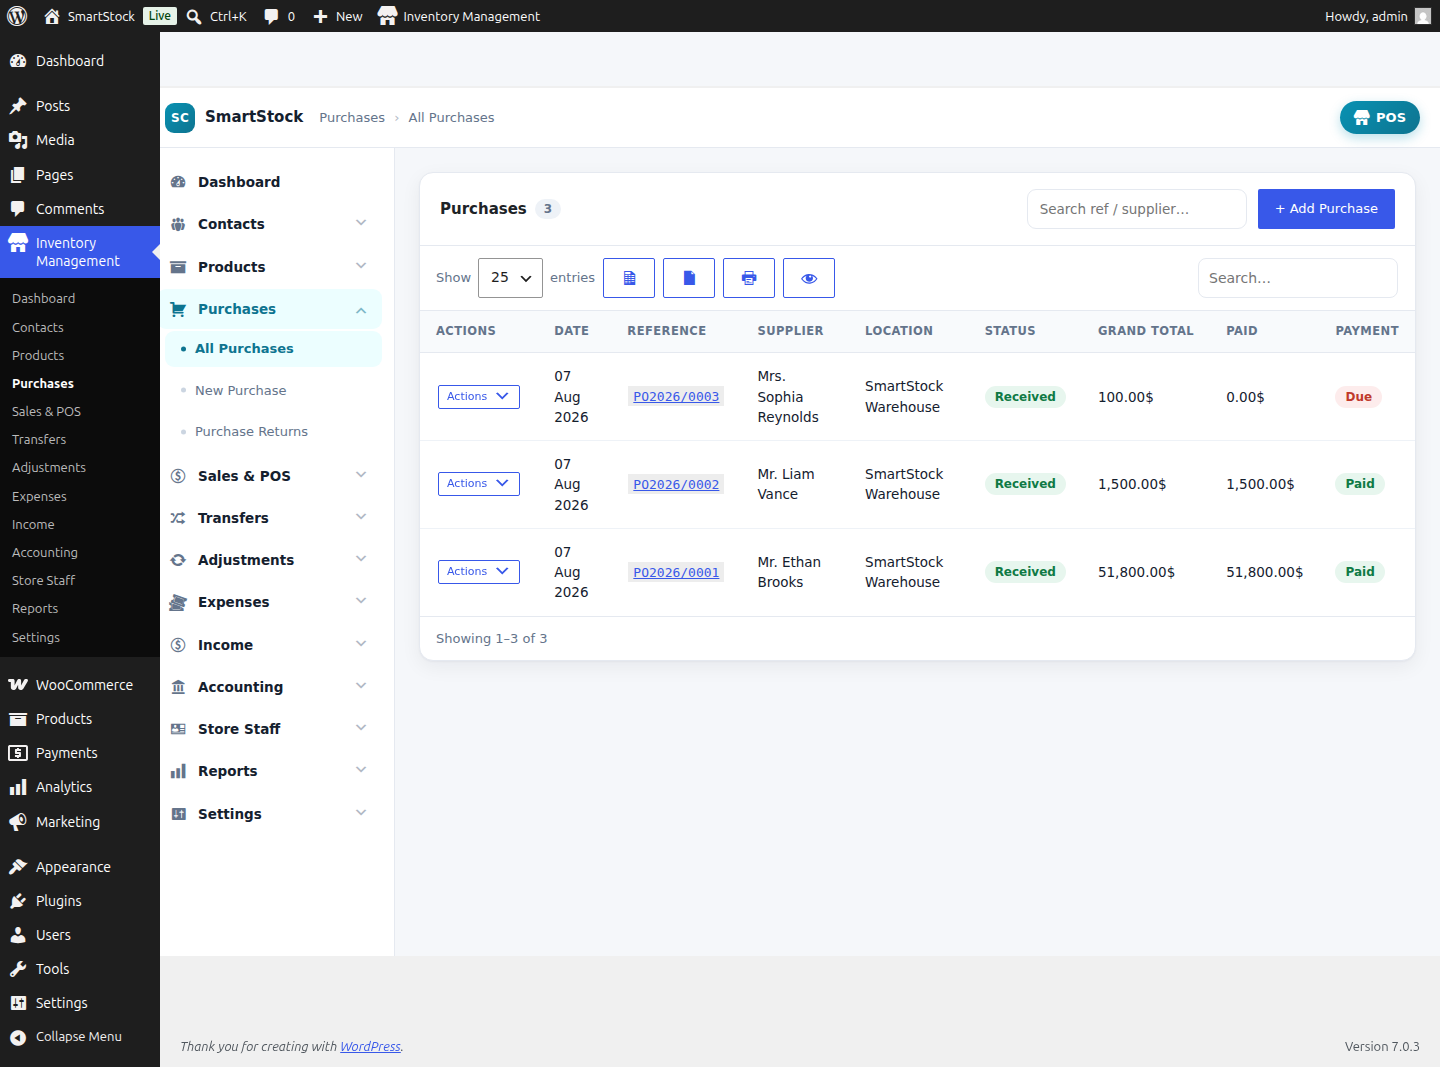
- Status — Received (stock added) or Pending. Toggling status re‑stocks / un‑stocks automatically.
- Payments — add supplier payments; the due updates and the account ledger posts.
New Purchase
 1
2
3
1
2
3
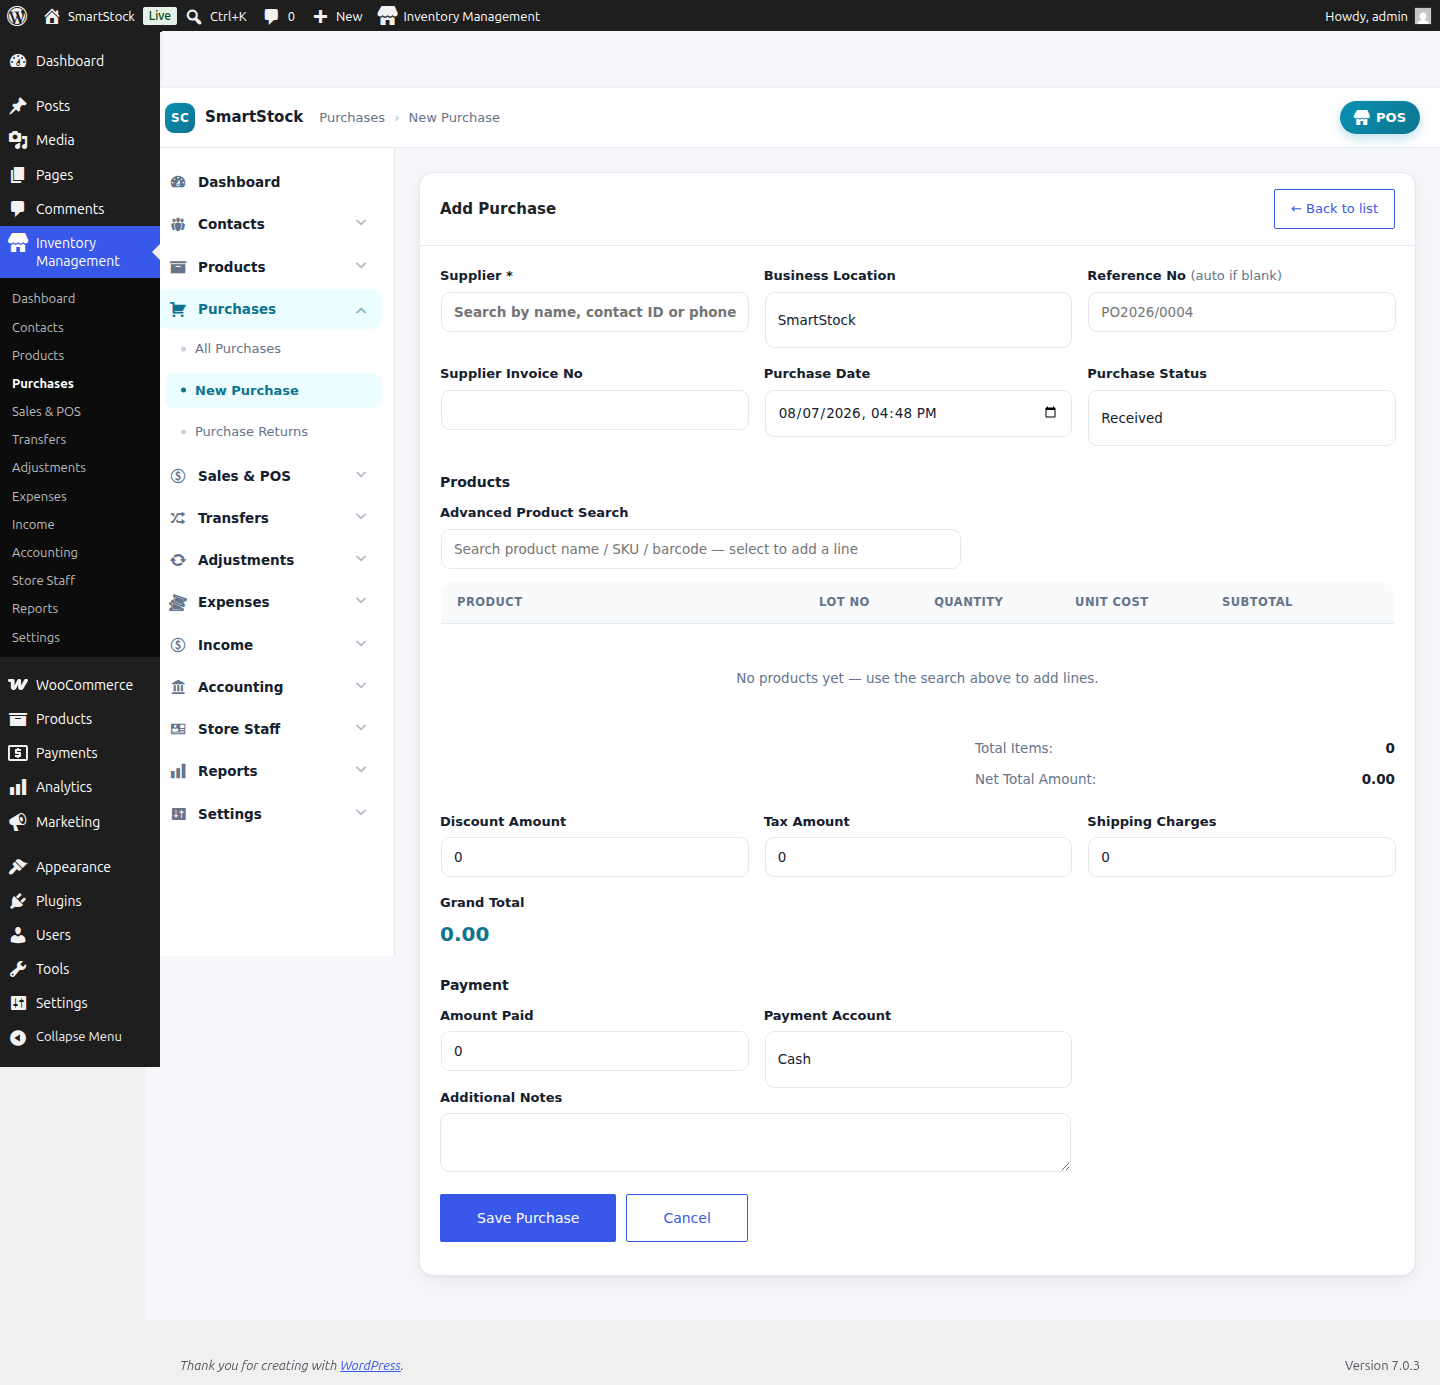
- 1 Supplier & Location — search a supplier by name/phone/ID, pick the receiving location, set the date.
- 2 Product search — type a name, SKU or barcode to add line items (works for simple & variable products). Set quantity, unit cost, lot number & expiry.
- 3 Totals & payment — net total, plus an optional payment on create (which posts to the chosen account).
Purchase Returns
Return goods to a supplier. Open a purchase’s Purchase Return action, enter the return quantity per line, an optional discount & return date — a live summary shows the total. The returns list gives full actions:
- View — the debit note with items, totals & supplier refunds.
- Edit — change quantities/discount/date; stock & ledgers are reversed and re‑applied correctly.
- Print — a professional debit note.
- Add Payment / View Payments — record supplier refunds (money back into your account).
- Delete — fully reverses stock, ledger and payments.
All Orders
Every sale — both POS and website orders — because WooCommerce orders are the single source of truth.
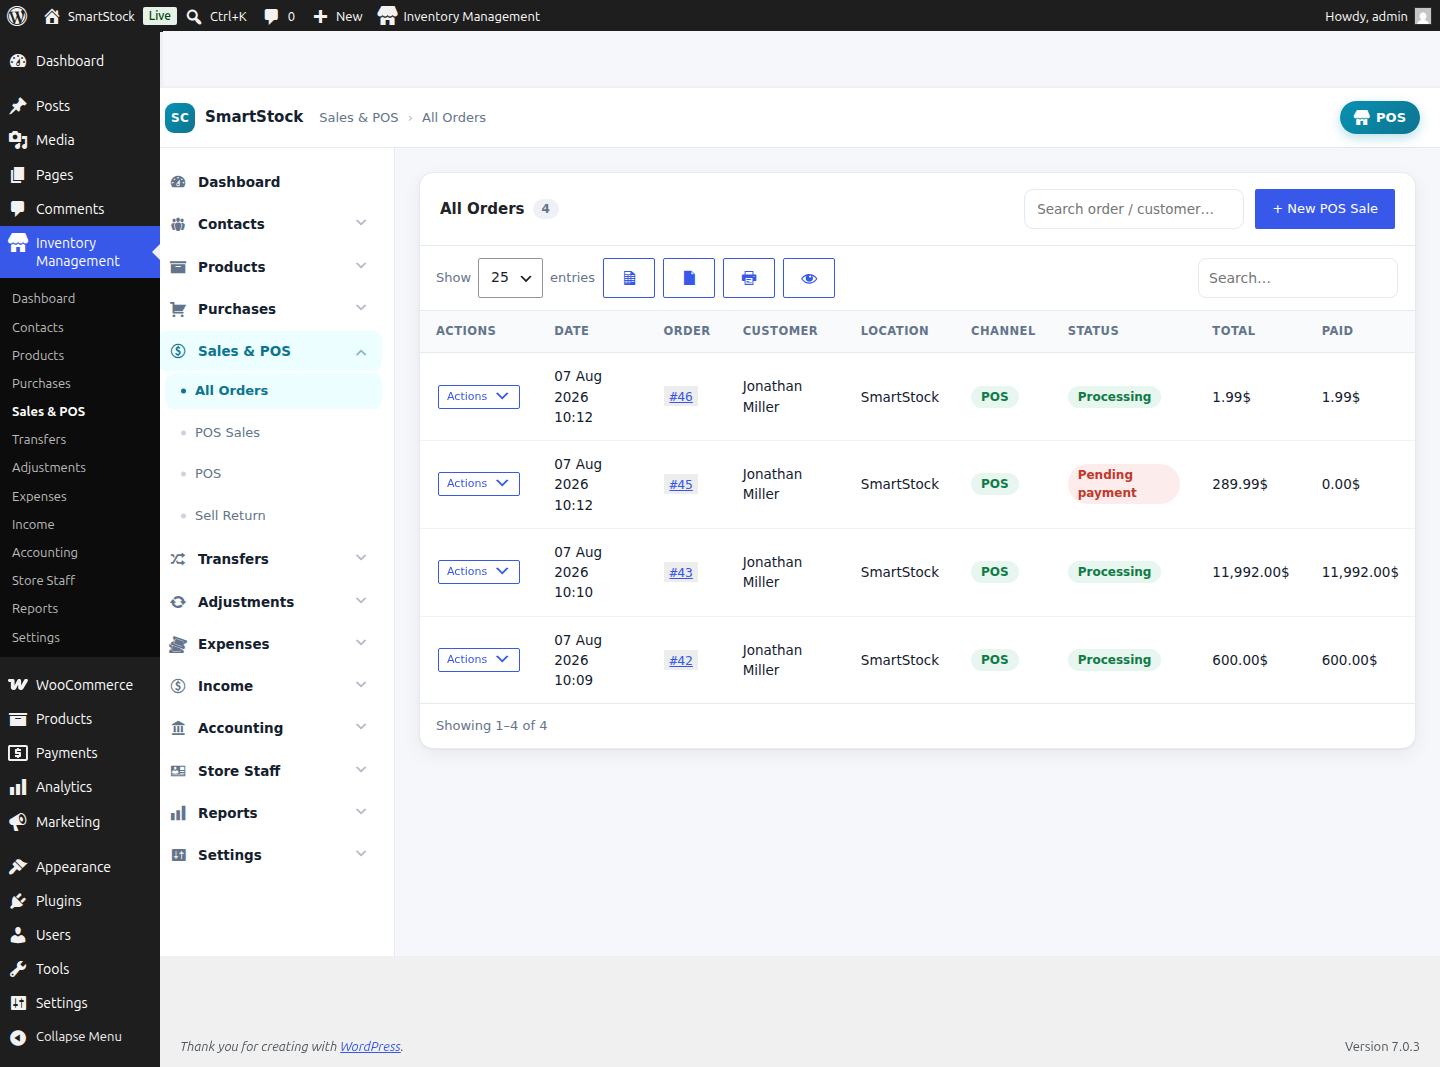
The Paid figure comes from the SmartStock payment ledger (not just WooCommerce’s paid flag), so editing or deleting a payment anywhere stays accurate.
POS Register
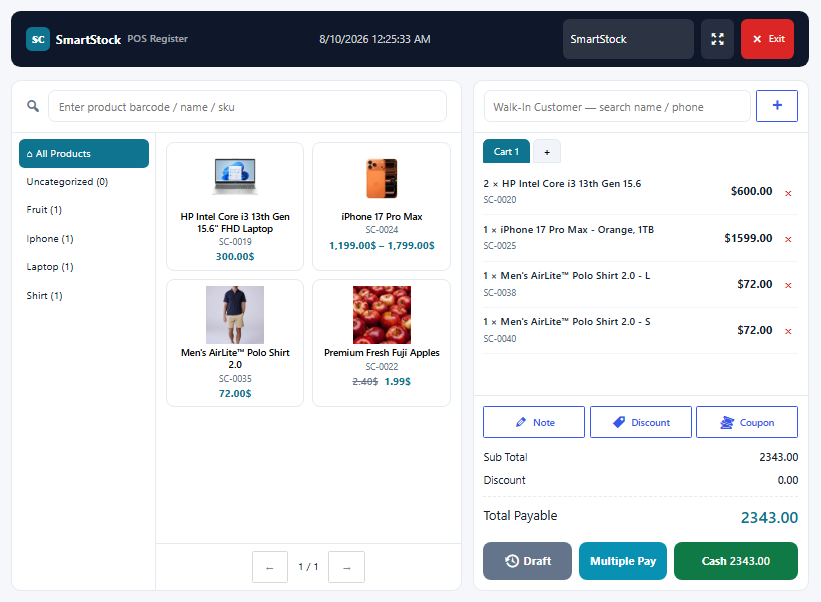
A fast, full‑screen touch register that creates real WooCommerce orders.
 1
2
3
4
1
2
3
4
- 1 Product search & grid — scan a barcode or type name/SKU; tap a product to add. Categories on the left filter the grid.
- 2 Customer & carts — search/create a customer; run several parallel carts (Cart 1, 2, 3…).
- 3 Cart actions — Note, Discount and Coupon buttons; edit line quantity/price/discount in a popup.
- 4 Checkout — Draft (hold), Multiple Pay or Cash. The pay popup lists your Payment Accounts, supports multi‑payment and prints the invoice on submit.
POS Sales
The same list as All Orders but filtered to POS‑only sales (website/WooCommerce orders are hidden) — handy for cashiers and shift supervisors to review just the register’s takings.
- Same columns & actions — Invoice No, Date, Customer, Location, Total, Paid/Due, Status, plus View/Edit, Print Invoice, Packing Slip, Payments, Sell Return and Delete on each row.
- Location scope — staff who have Assigned Locations only see POS sales from those locations; unrestricted users see every location.
- Everyday use — reprint a receipt a customer lost, add a missing payment, or start a return without wading through website orders.
Sell Return
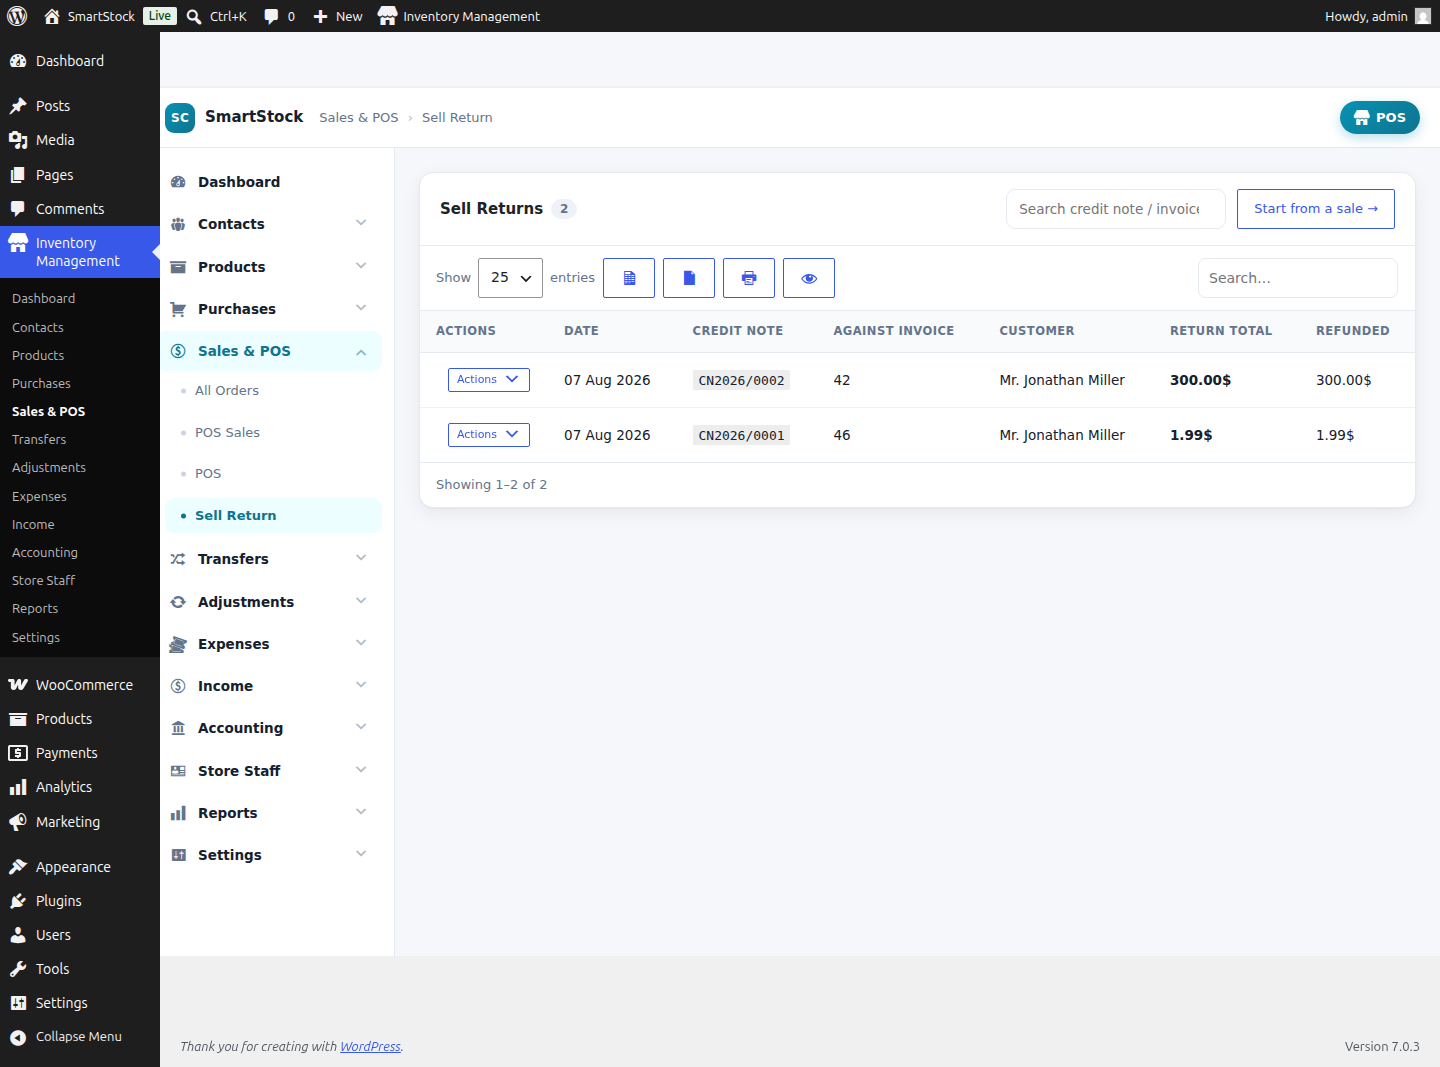
Refund/return items from any sale with correct stock, ledger and customer‑due effects.
Creating a return
From a sale’s Sell Return action you’ll see the header (Invoice No, Date, Customer, Location), each sold line with a Return Qty field, a live summary (subtotal, discount, total return), an optional discount (fixed/percent), a settable return date & time, and an optional cash refund from an account.
Managing returns
- View — the credit note with lines, totals & refunds.
- Edit — safely change quantities/discount; stock & ledgers reverse & re‑apply.
- Print — a professional credit note.
- Add Payment / View Payments — record refunds to the customer.
- Delete — reverses restored stock and refunds everywhere.
Stock Transfers
Move stock between your business locations.
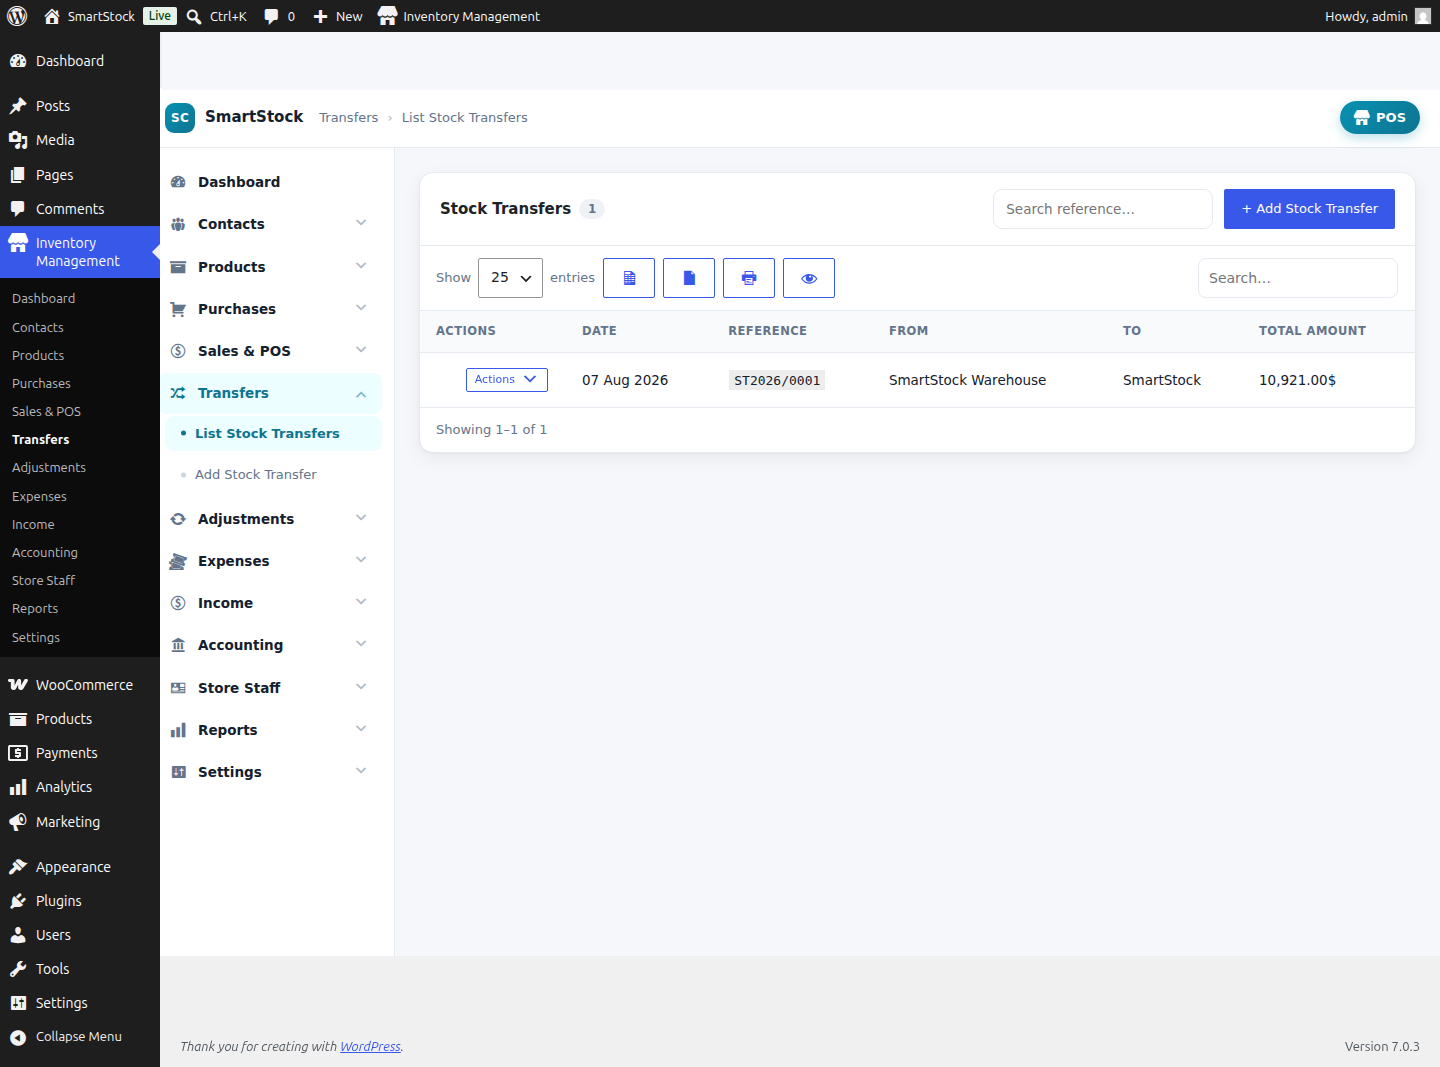
Click Add Stock Transfer and complete these fields:
| Field | What it does | Default |
|---|---|---|
| From Location * | The source warehouse/branch stock leaves. | First location |
| To Location * | The destination warehouse/branch stock arrives at. | First location |
| Reference No | Document number. Leave blank to auto‑generate the next sequential ref. | Auto |
| Date | Transfer date & time. | Now |
| Advanced Product Search | Type a name, SKU or barcode to add line items (simple products & individual variations). Each line shows a read‑only Unit Cost and an editable Quantity. | — |
| Notes | Optional memo stored with the transfer. | — |
On Save Transfer, SmartStock records a transfer_out at the source and a matching transfer_in at the destination. The company‑wide total is unchanged — only the per‑location balances move — and WooCommerce stock stays in sync. Editing or deleting a transfer reverses both sides cleanly.
Stock Adjustments
Correct stock for damage, loss, theft or counting differences.
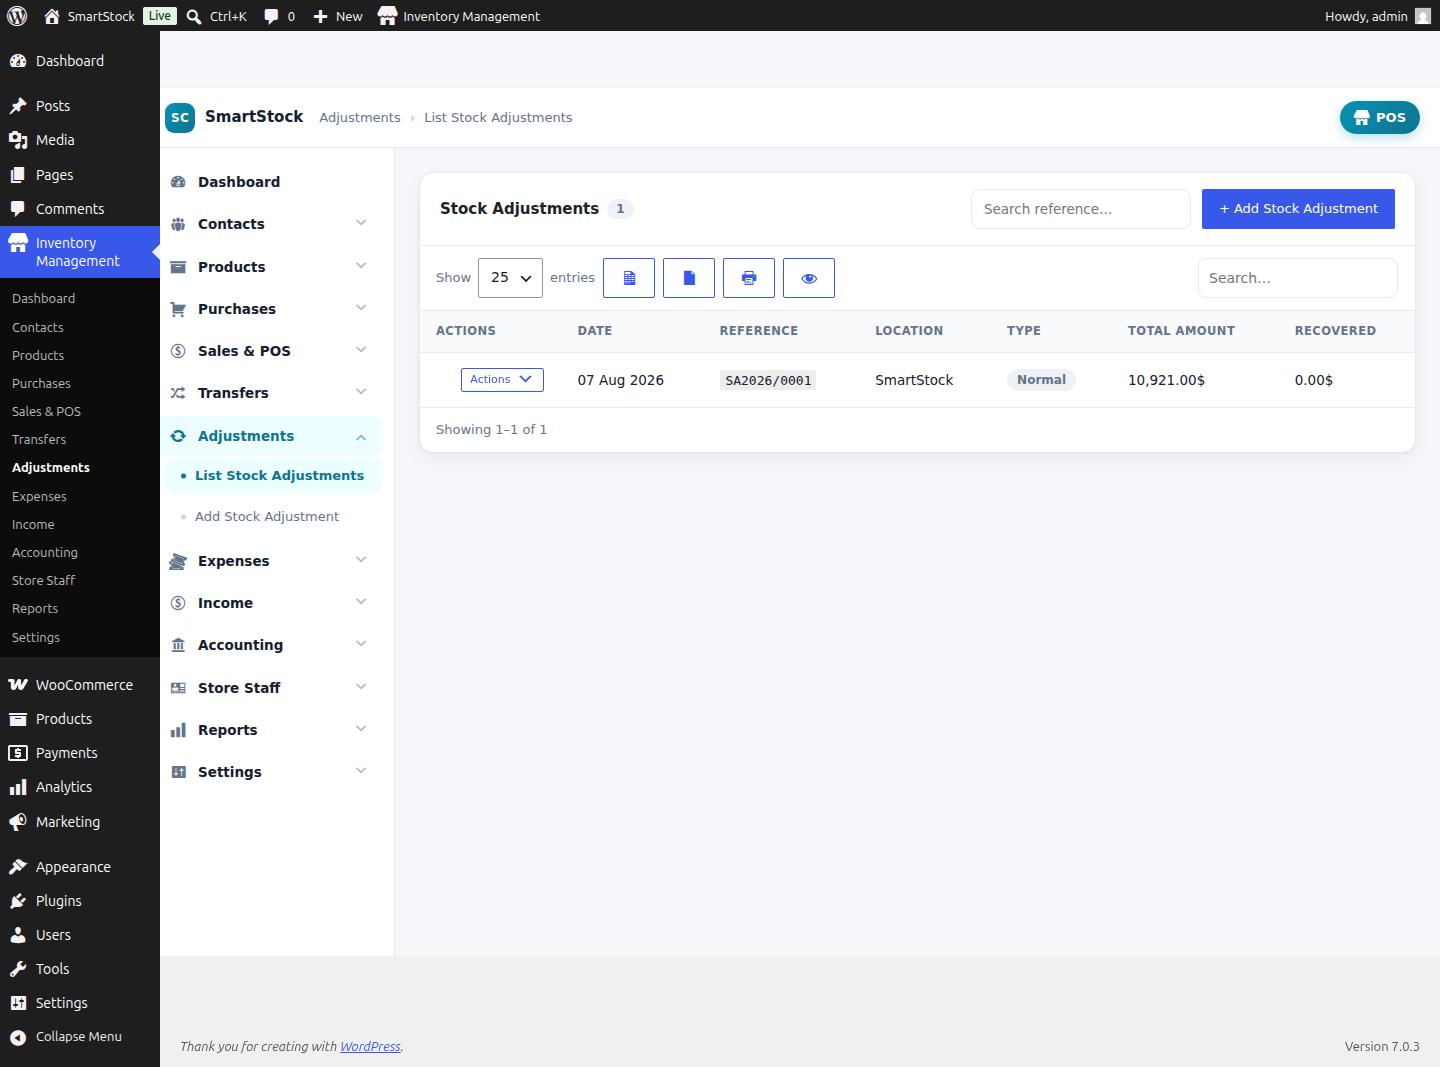
Click Add Stock Adjustment and complete these fields:
| Field | What it does | Default |
|---|---|---|
| Business Location | The location whose stock you are correcting. | First location |
| Reference No | Document number. Leave blank to auto‑generate. | Auto |
| Date | Adjustment date & time. | Now |
| Adjustment Type | Normal (routine count/correction) or Abnormal (unusual loss — theft, fire, damage) — for reporting/classification. | Normal |
| Total Amount Recovered | Any value recovered against the loss (e.g. insurance/scrap sale) — used in loss reporting. | 0 |
| Advanced Product Search | Add line items by name/SKU/barcode. Each line has a read‑only Unit Cost, an Adjust selector (Subtraction / Addition) that sets the sign, and a Quantity. | — |
| Reason / Notes | Why the adjustment was made — kept for the audit trail and the Stock Adjustment report. | — |
On Save Adjustment, SmartStock writes signed adjustment movements to the ledger (negative for Subtraction, positive for Addition) and updates the WooCommerce quantity. This is exactly how you fix “Variable product qty not going minus” situations — pick the variation, choose Subtraction, save.
Expenses
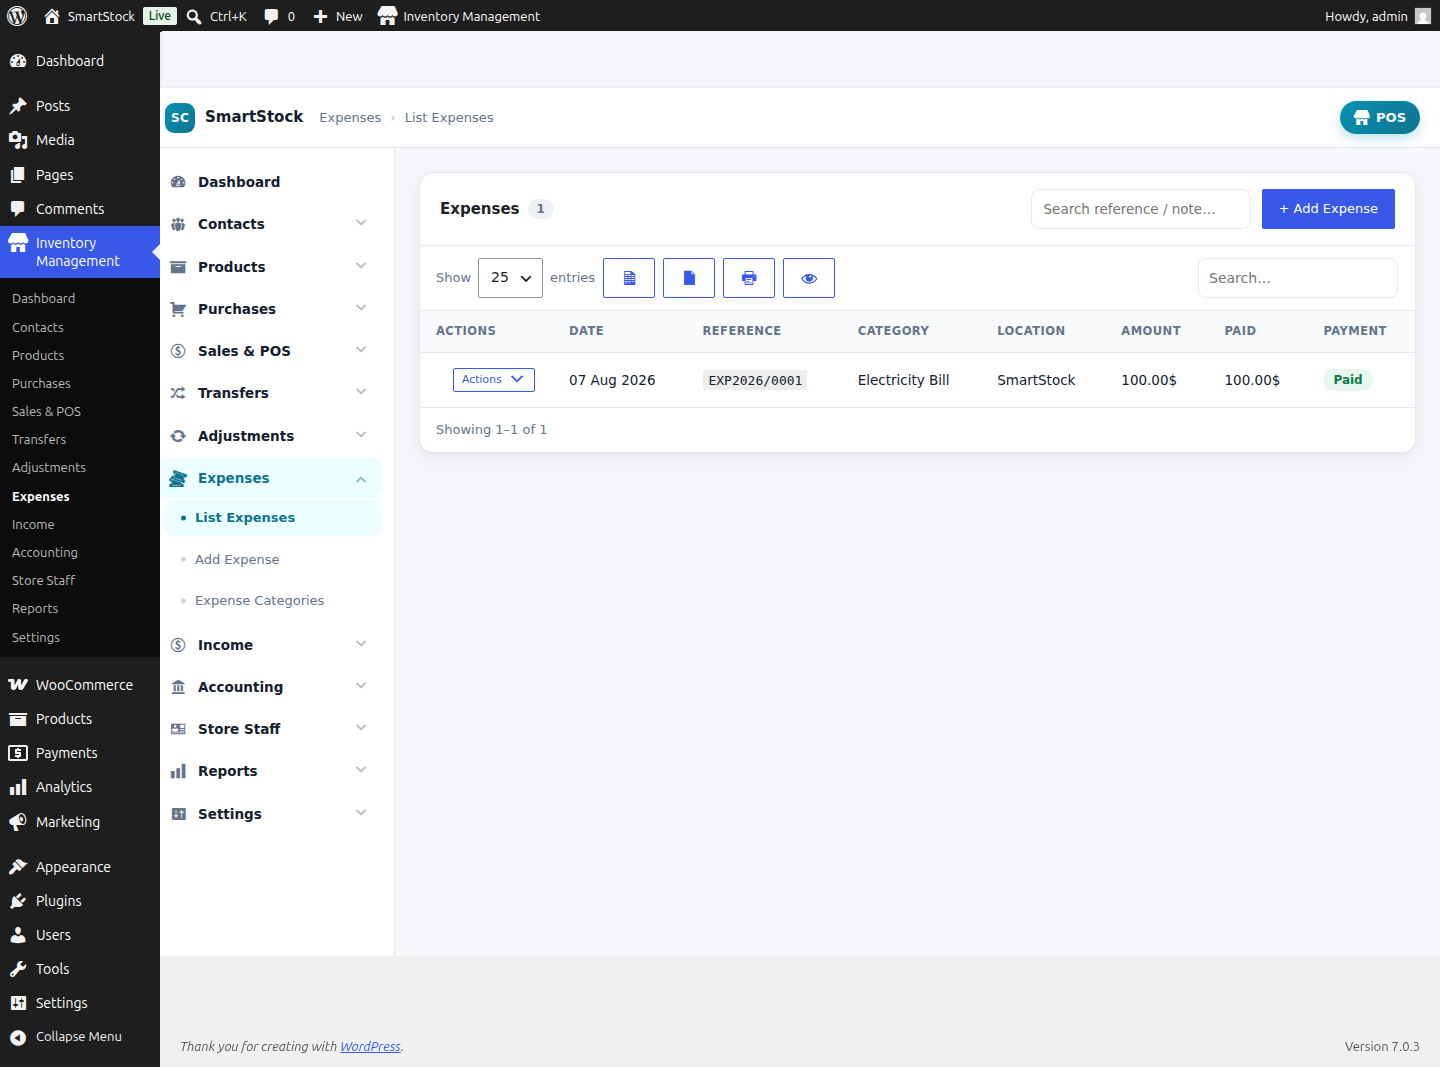
Click Add Expense and complete these fields:
| Field | What it does | Default |
|---|---|---|
| Business Location | Which location the expense belongs to. | First location |
| Expense Category | Groups the spend (Rent, Salary, Utilities…) for the Expense Report. | — Select — |
| Reference No | Document number. Leave blank to auto‑generate. | Auto |
| Date | When the expense occurred. | Now |
| Amount * | The expense value. | 0 |
| Payment Account | The cash/bank account the money leaves. Choosing one debits that account's ledger; “— None —” records the expense without a cash movement. | — None — |
| Notes | Optional description. | — |
Expense Categories — a sub‑screen to create, rename and delete categories. Every category feeds the category breakdown in the Expense Report.
Income

Record money that isn't a product sale — services, rent received, interest, scrap sales. Click Add Income:
| Field | What it does | Default |
|---|---|---|
| Business Location | Which location the income belongs to. | First location |
| Income Category | Groups the income for reporting. | — Select — |
| Reference No | Document number. Leave blank to auto‑generate. | Auto |
| Date | When the income was received. | Now |
| Amount * | The income value. | 0 |
| Received Into (Payment Account) | The cash/bank account the money enters — choosing one credits that account's ledger. | — None — |
| Notes | Optional description. | — |
Income Categories — manage the category list exactly like expense categories.
Payment Accounts
Cash & bank accounts where money flows in and out.
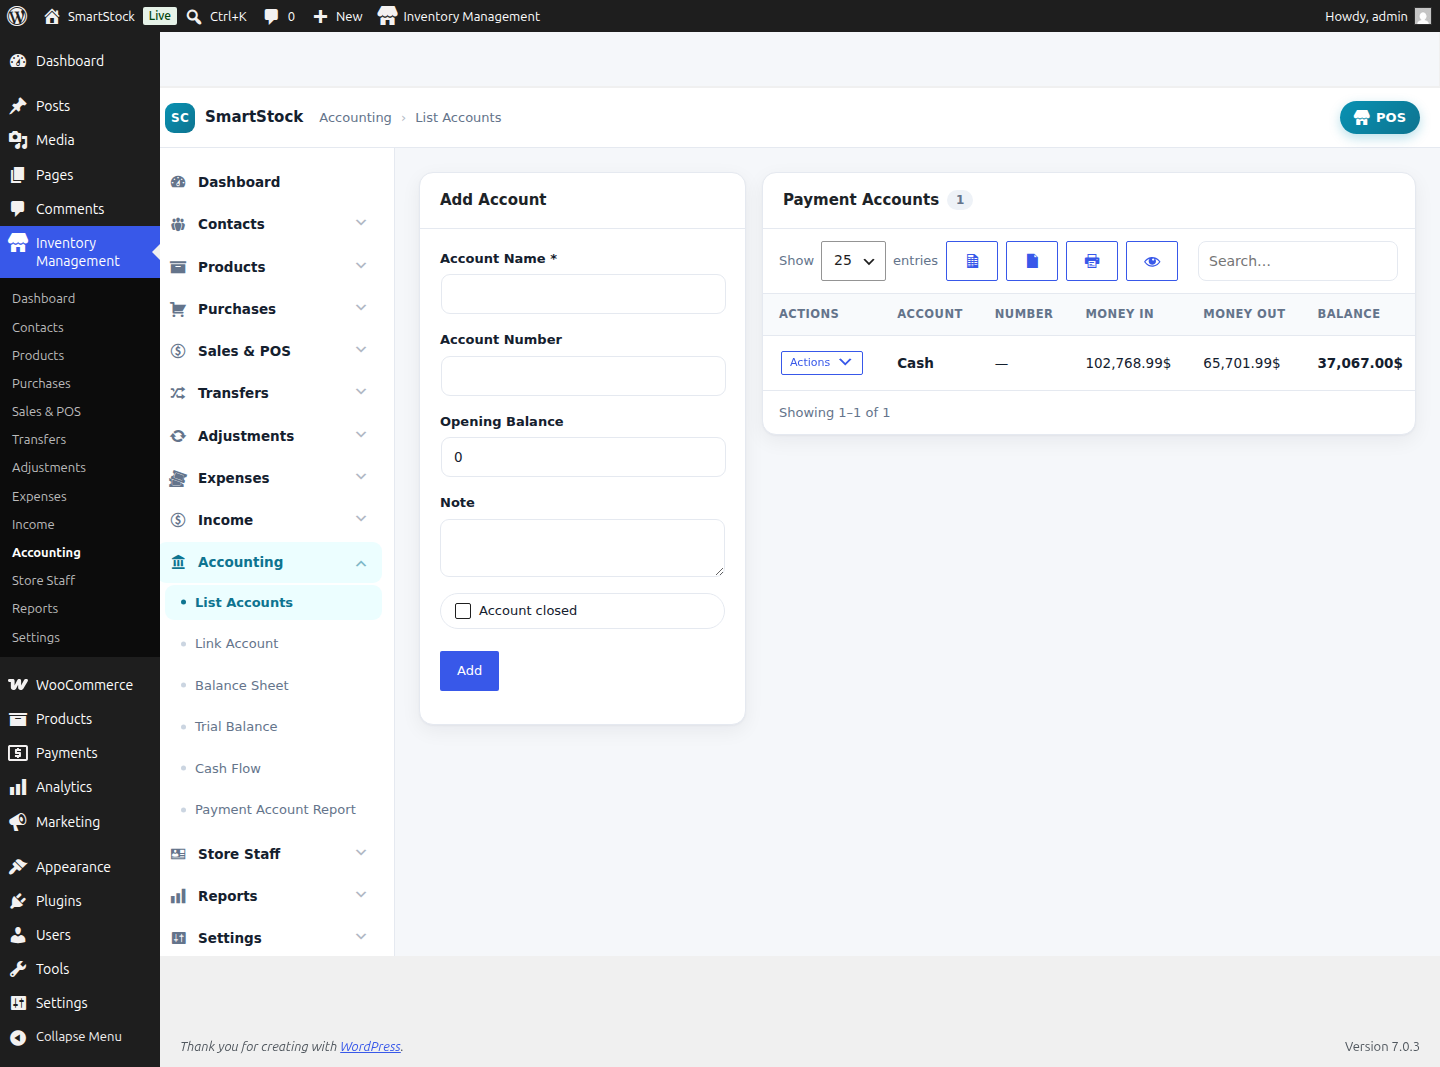
Every sale payment, purchase payment, expense, income and refund posts to an account, so each account’s balance is always live. Create an account with Add Account (Name, optional Account Number, opening balance & note); then manage it with the row actions below.
| Action | What it does |
|---|---|
| Account Book | The account’s full dated ledger — every debit and credit with running balance, filterable by date. This is your per‑account audit trail. |
| Fund Transfer | Move money from this account to another (e.g. Cash → Bank). Posts a matching debit and credit so the combined balance is unchanged. |
| Deposit | Add money into the account that isn’t a sale/income (e.g. owner capital, opening float). Credits the ledger. |
| Withdraw | Take money out that isn’t an expense/purchase (e.g. owner drawings). Debits the ledger. |
| Close / Re‑open | Hide a disused account from selectors without deleting its history; re‑open when needed. |
| Delete | Remove an account (only when safe). Its transactions are preserved for reporting integrity. |
Link Account
Reconciliation helper: any payment recorded without an account appears here so you can attach it to the correct account in one click. When empty, all payments are already linked.
Balance Sheet · Trial Balance · Cash Flow · Account Report
- Balance Sheet — assets (account balances, stock value) vs liabilities.
- Trial Balance — debits & credits per account, proving the books balance.
- Cash Flow — money in vs out over a period.
- Payment Account Report — pick an account and see its full ledger & balance.
Staff & POS Access
Turn WordPress users into cashiers / store staff and control exactly what they can do.
 1
2
1
2
- 1 Actions — View Profile, Assign Locations, Assign Accounts, Edit User.
- 2 POS Staff switch — the master access gate. Yes = the user can use the plugin (per their role caps); No = fully blocked. Administrators are always enabled (the switch is locked on).
Assign Locations & Payment Accounts
Assign Locations
Tick the business locations a staff member may access. Assigned → they only see those locations’ stock & orders; none assigned → all locations.
Assign Accounts
Tick the payment accounts a staff member may take/manage payments on. Assigned → they only see & use those accounts (POS, order payments, everywhere); none assigned → all accounts.
Roles & Permissions
Create custom roles (optionally cloned from an existing one) and tick a granular capability matrix — view/add/edit/delete per module (Contacts, Products, Purchases, Sales, Accounting, Reports…). Assign the role to a user, flip their POS Staff switch on, and they get exactly the access you granted.
Reports
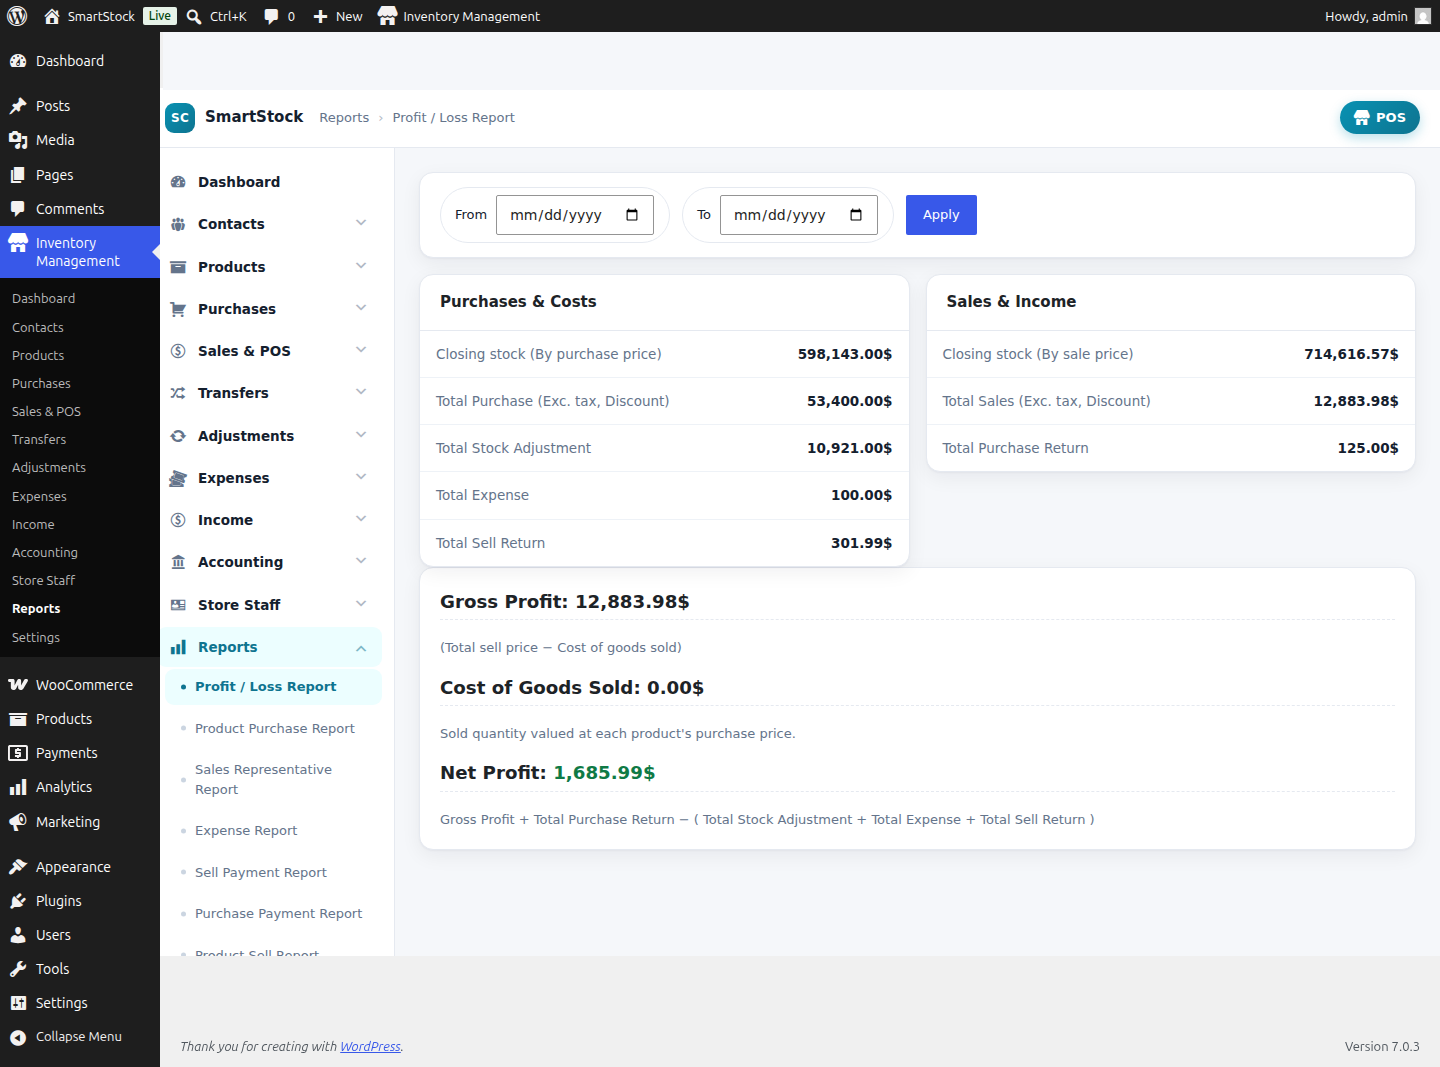
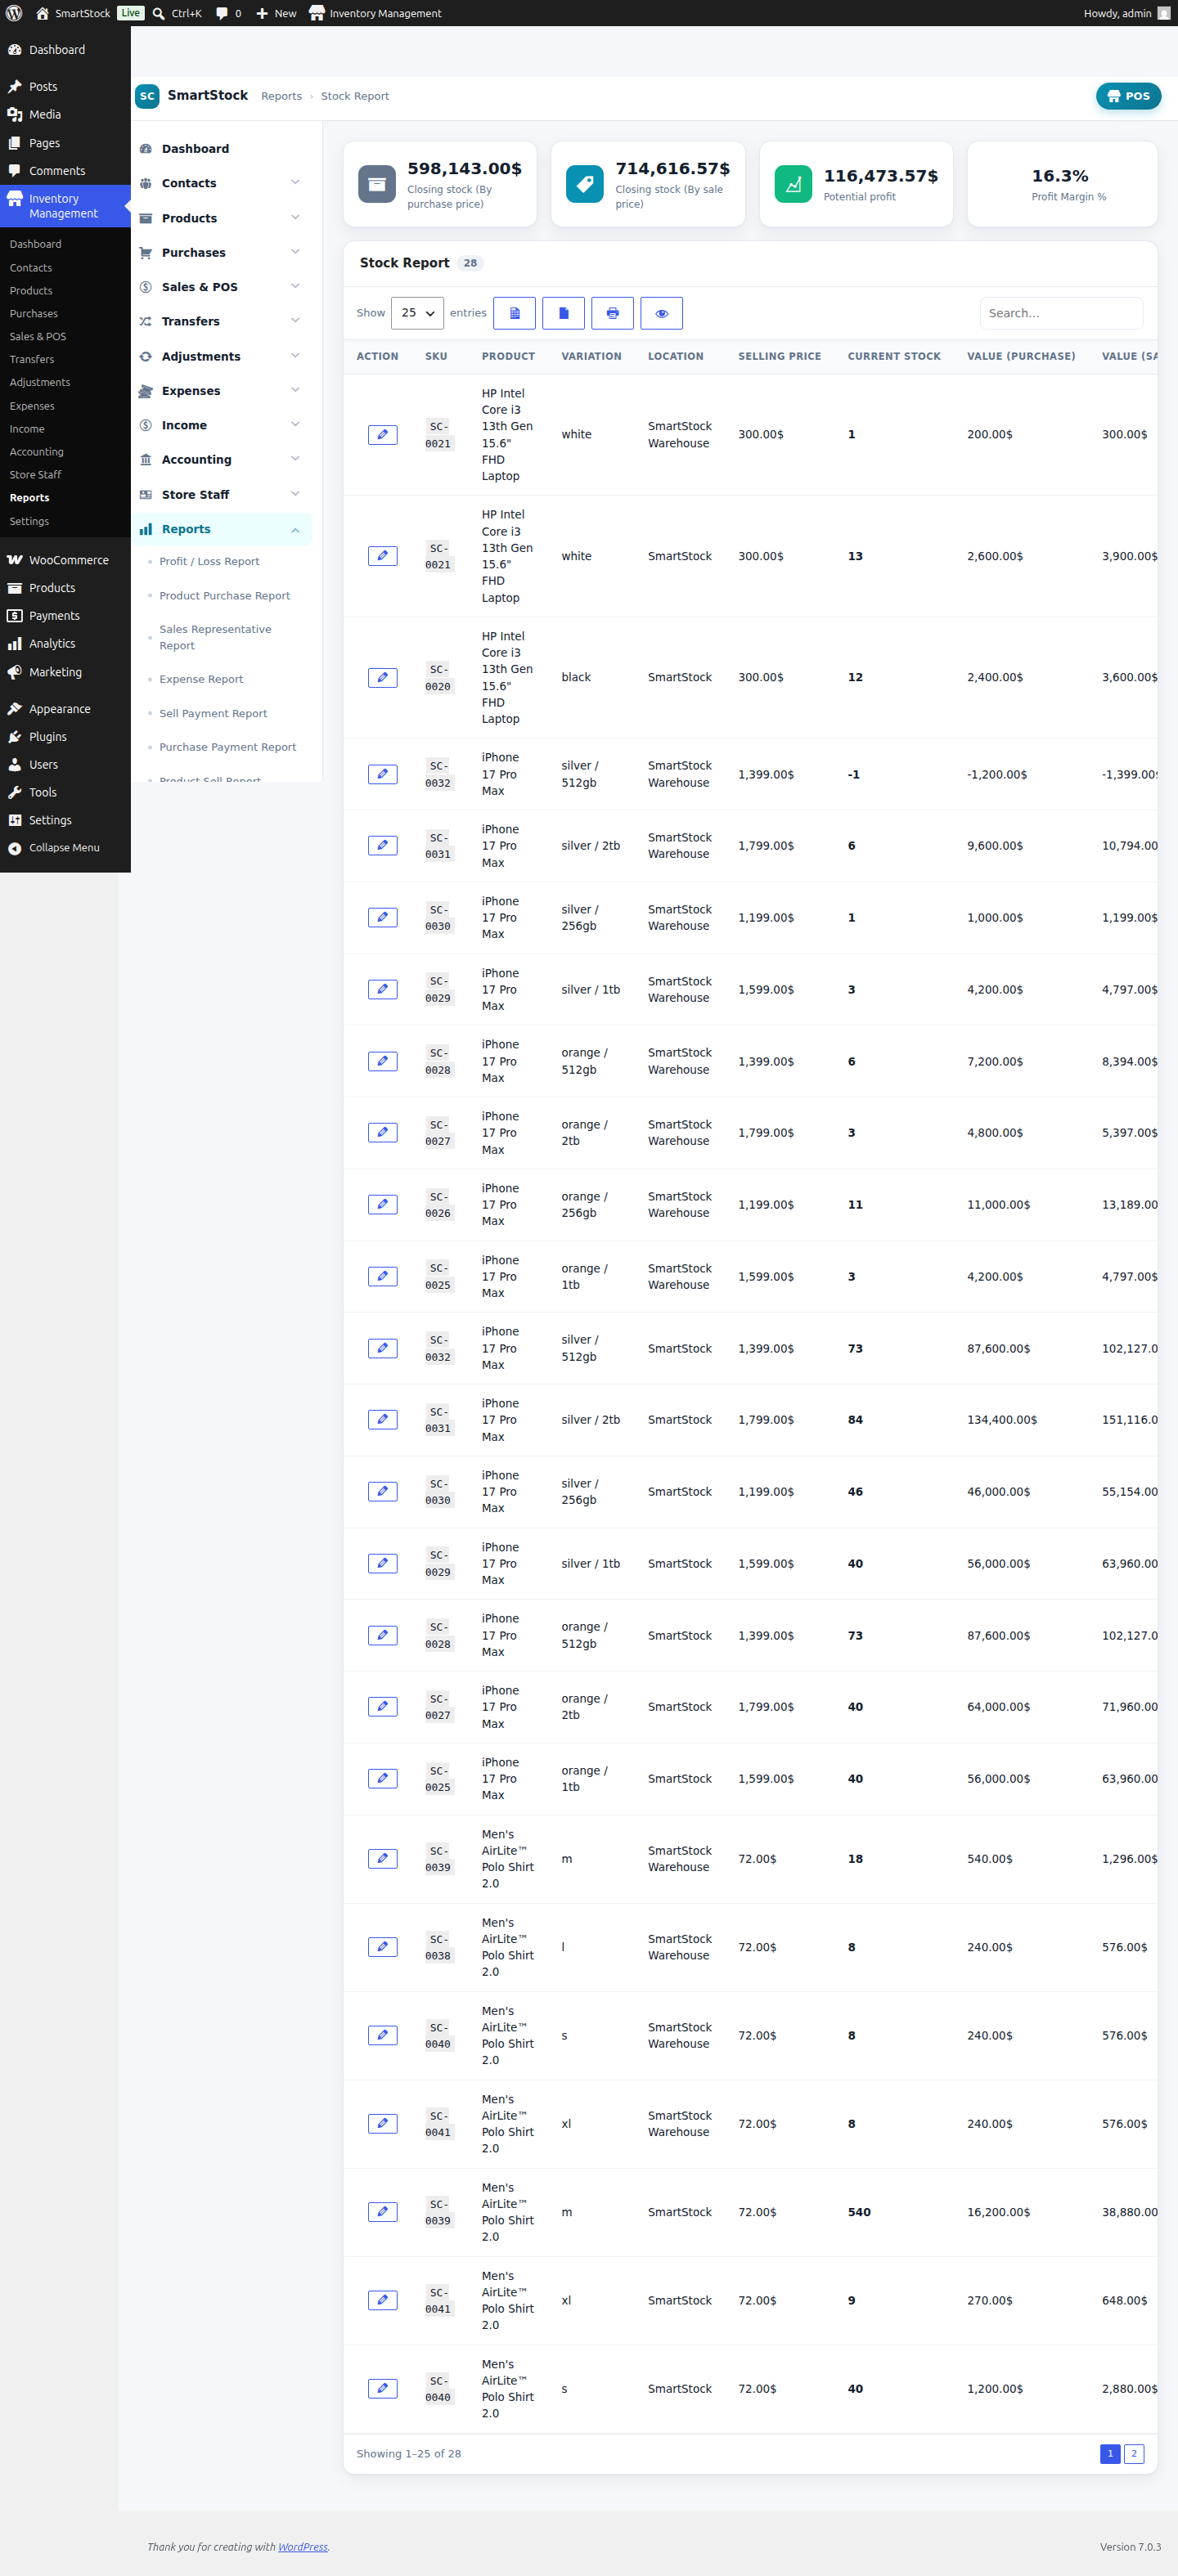
12+ built‑in reports, each with a date‑range filter and export.
| Report | Shows |
|---|---|
| Profit / Loss | Sales, purchases, expenses, closing stock → gross & net profit. |
| Stock Report | Per product/variation/location quantity & valuation (at cost & sale price). |
| Product Purchase | Line‑level purchases with supplier & product links. |
| Sales Representative | Sales grouped by the staff who made them. |
| Expense Report | Expenses by category & period. |
| Sell / Purchase Payment | All payments received / paid in a period. |
| Product Sell | Which products sold, quantity & value. |
| Items / Purchase & Sale | Item‑level movement comparisons. |
| Trending Products | Best sellers over a period. |
| Stock Adjustment | All adjustments with reasons. |
Settings — Business & General
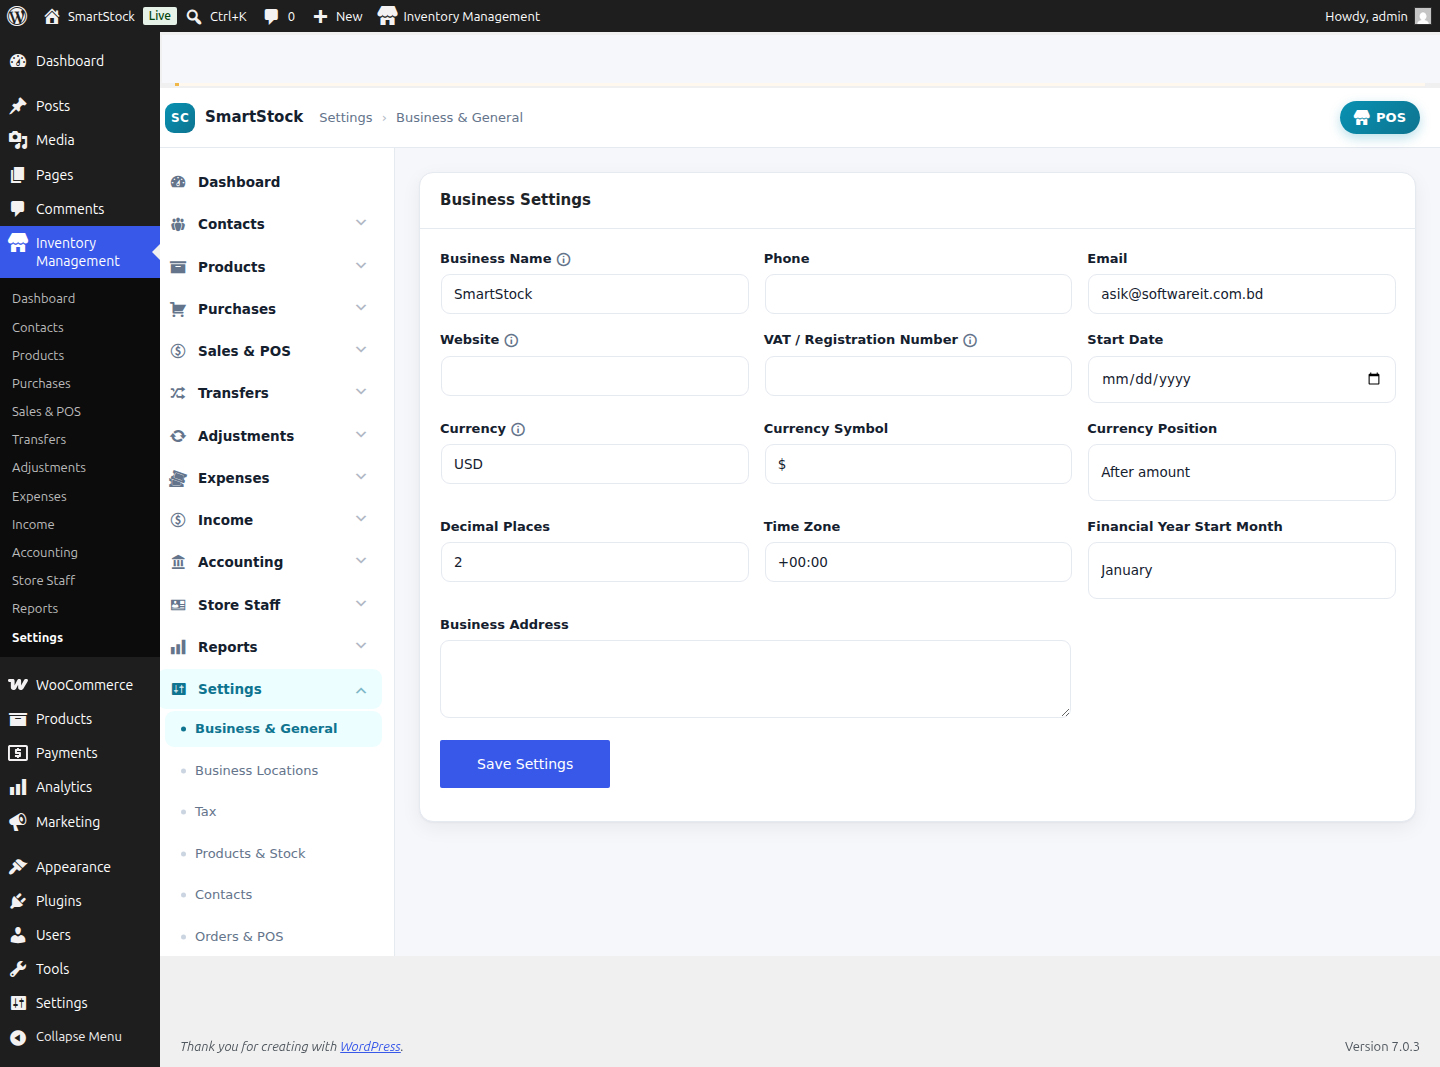
This is the first screen to complete after activation. Every field here feeds invoices, barcode labels, the POS header and the accounting reports, so fill it in fully before you start trading.
| Option | What it does | Default |
|---|---|---|
| Business Name | Your legal/trading name. Printed on every invoice & label and shown in the POS register header. | — |
| Phone | Contact number shown in the invoice company block. | — |
| Business email shown on invoices and used as a reply‑to hint for notifications. | — | |
| Website | Shown in the invoice company block under your name. | — |
| VAT / Registration Number | Tax/registration ID. Only printed when Show VAT Registration Number is enabled in Invoice settings. | — |
| Start Date | The opening date of your books — reports and the financial year use it as the earliest boundary. | — |
| Currency | WooCommerce currency code (e.g. BDT, USD). Saving this updates WooCommerce’s own currency so the store and inventory always match. | WC currency |
| Currency Symbol | Symbol rendered before/after amounts (e.g. ৳, $). | WC symbol |
| Currency Position | Where the symbol sits: Before amount, After amount, or the spaced variants. | Before amount |
| Decimal Places | Number of decimals used when displaying money everywhere in SmartStock. | 2 |
| Time Zone | Used to timestamp ledger entries, stock history and reports. | Site TZ |
| Financial Year Start Month | Month your fiscal year opens — drives the Profit & Loss and dashboard period ranges. | January |
| Business Address | Multi‑line address printed in the invoice company block. | — |
Settings — Business Locations
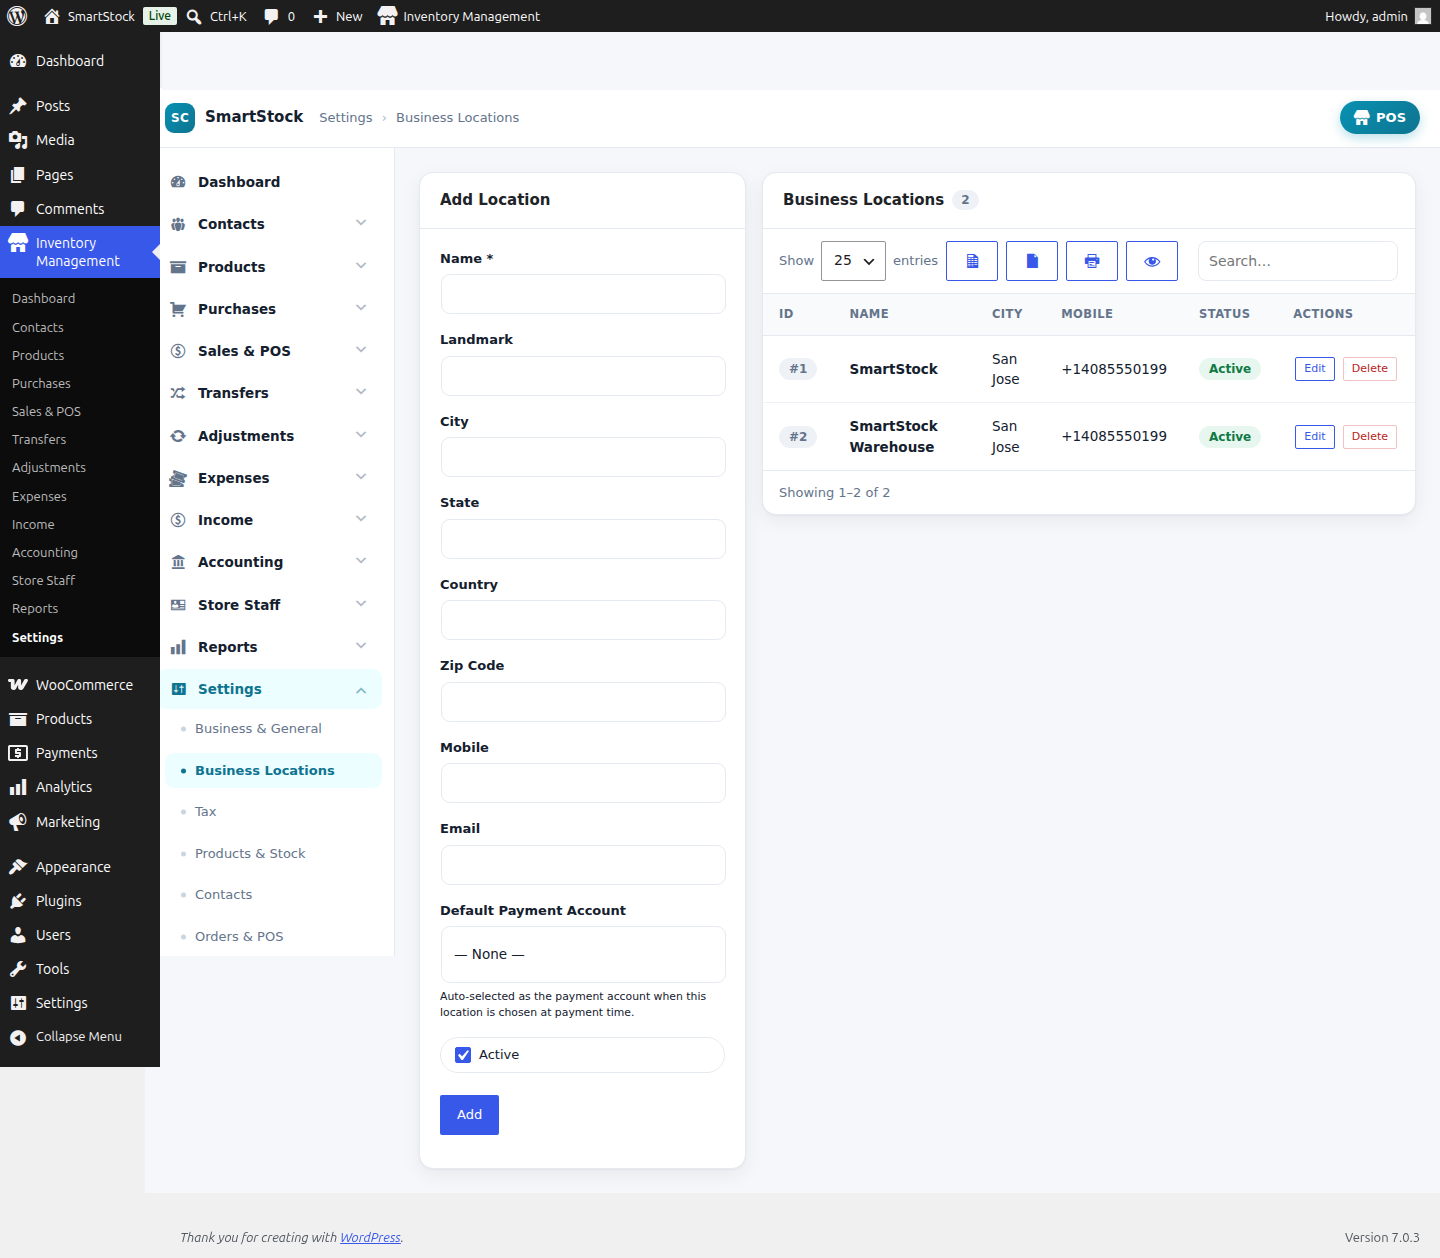
SmartStock is multi‑location from the ground up. Every stock figure — opening stock, purchases, sales, transfers and adjustments — is held per location. Create one location per shop, warehouse or outlet. Purchases, the POS, transfers and reports all let you pick which location a movement belongs to.
| Field | What it does |
|---|---|
| Name | Location label shown in every location dropdown and on invoices/packing slips. |
| Landmark / City / State / Country / Zip Code | Full address block for the location — printed as the “from / warehouse” address on invoices when warehouse info is enabled. |
| Mobile / Email | Per‑location contact details. |
| Default Payment Account | The payment account that auto‑selects whenever this location is chosen at payment time (POS, purchase, expense). Choose — None — to leave it manual. |
| Active | Inactive locations are hidden from dropdowns but keep their history intact. |
The list below the form shows every location with its city, mobile, status and Edit / Delete actions. A prefix (default BL) auto‑numbers each location — change it under Reference Prefixes.
Settings — Tax
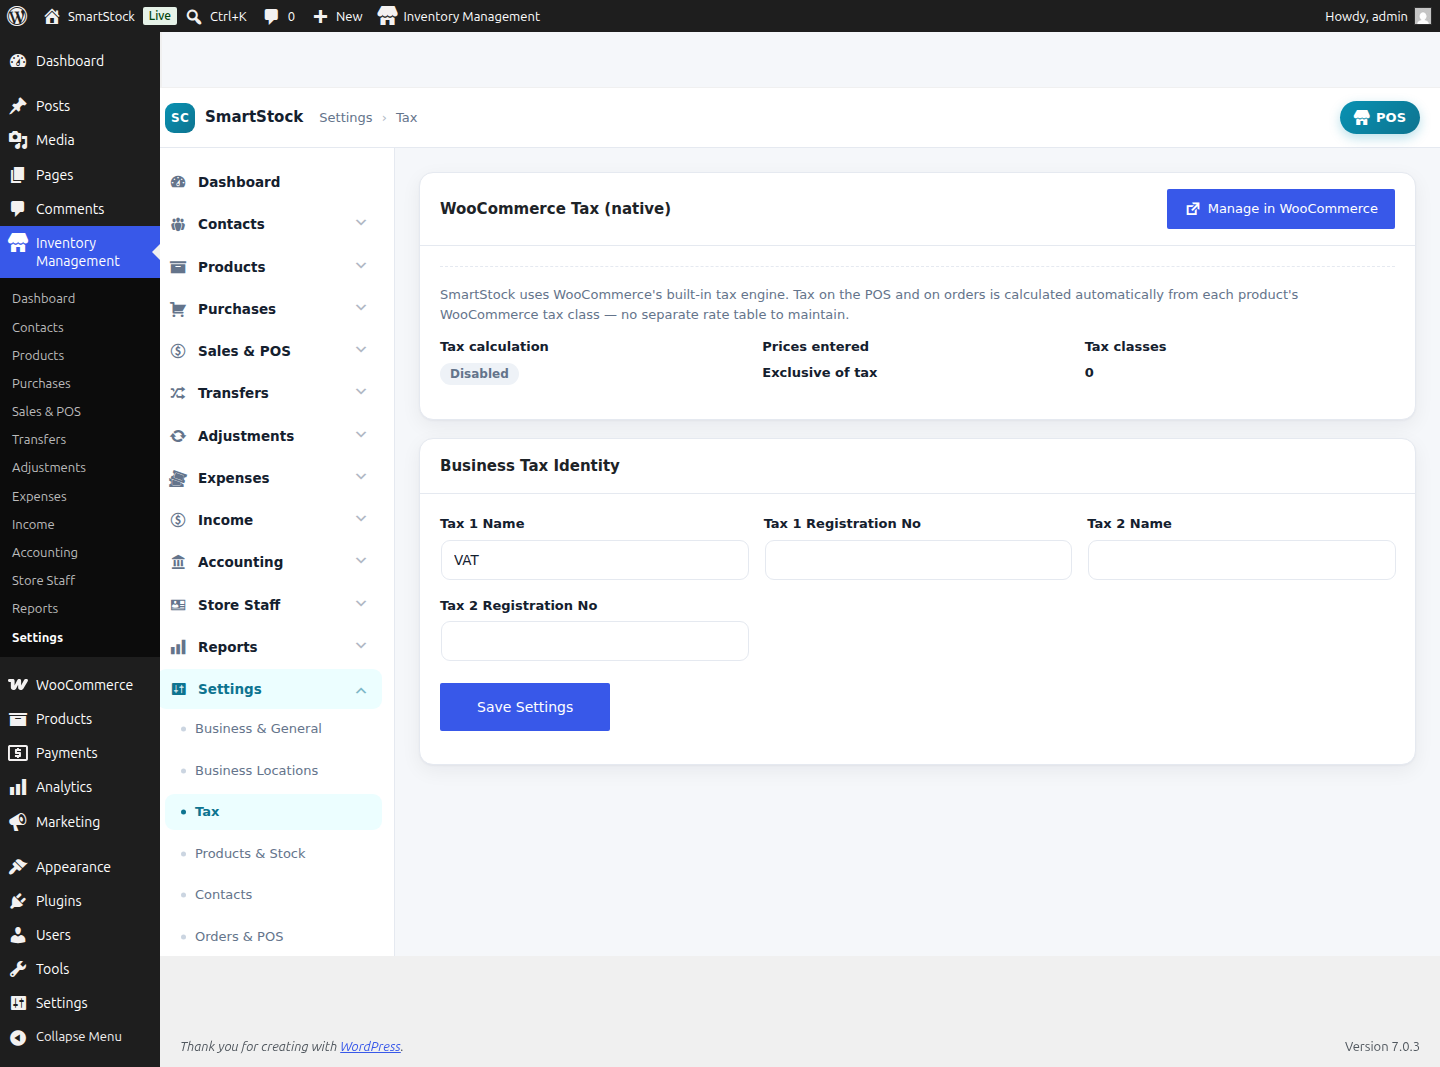
SmartStock reuses WooCommerce’s native tax engine for all rate calculation, so you never maintain two tax tables. The POS reads the WooCommerce tax class on each product and computes tax per line — correctly handling both inclusive and exclusive prices. This screen adds the registration identifiers that print on documents.
| Field | What it does | Default |
|---|---|---|
| Tax 1 Name | Label for your primary tax (e.g. VAT, GST) shown in invoice tax breakdowns. | VAT |
| Tax 1 Registration No | Your registration number for that tax, printed on invoices. | — |
| Tax 2 Name | Optional second tax label (e.g. a secondary/municipal tax). | — |
| Tax 2 Registration No | Registration number for the second tax. | — |
Actual rates (standard/reduced/zero and per‑class percentages) are managed in WooCommerce → Settings → Tax; the screen links straight there via “Manage in WooCommerce”.
Settings — Products & Stock
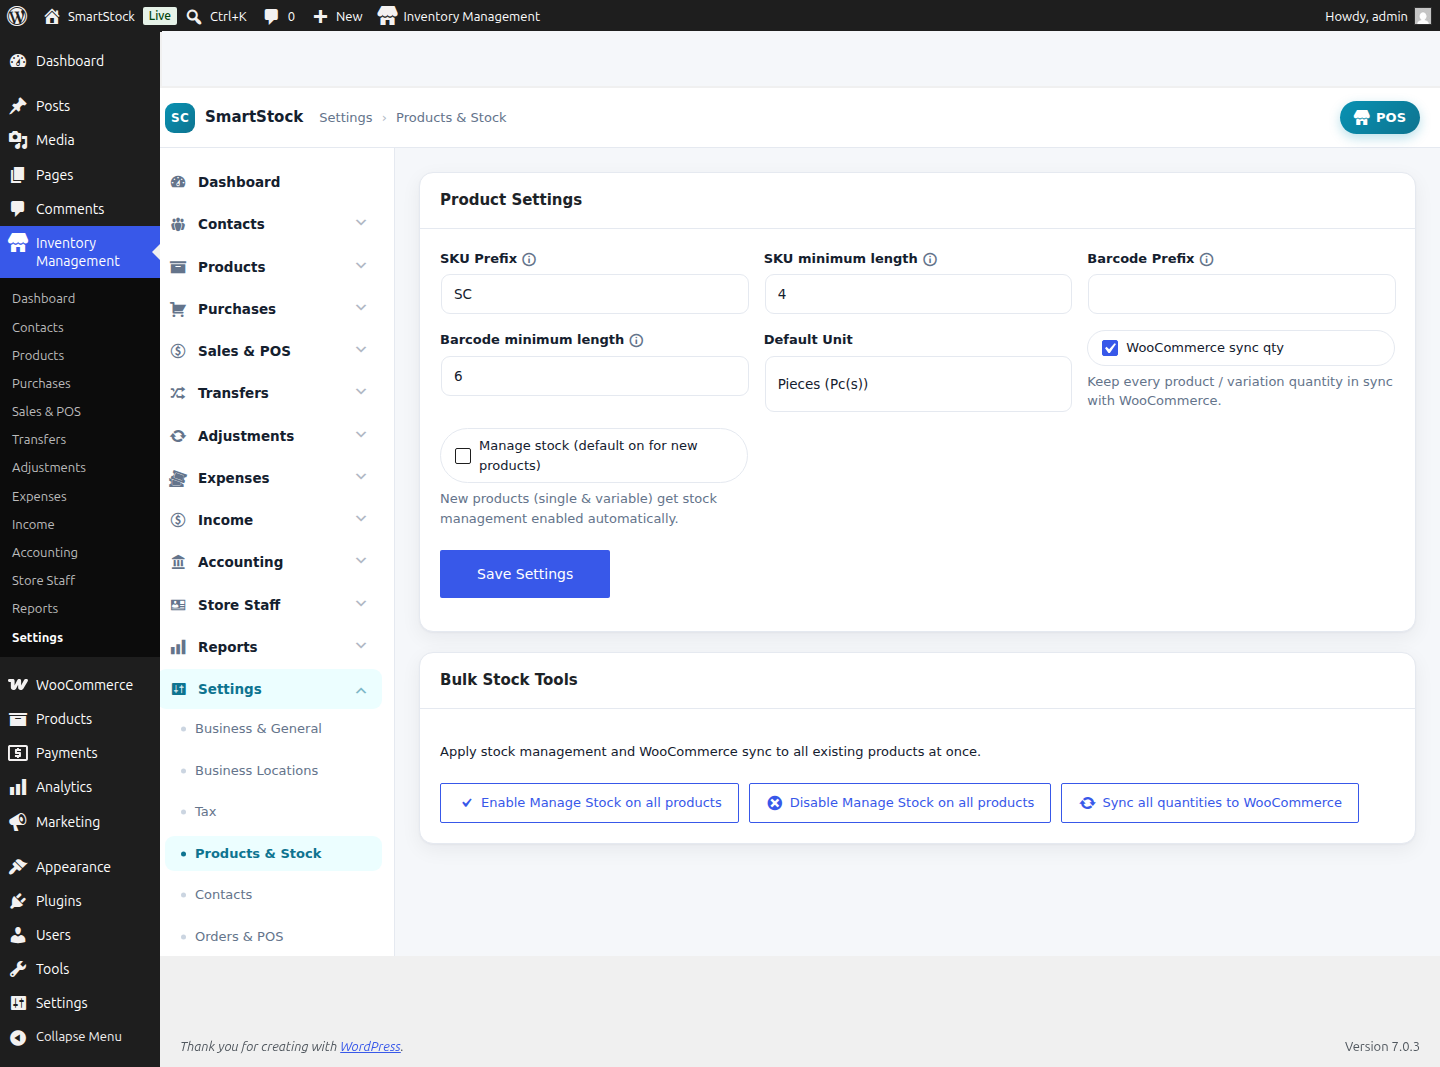
| Option | What it does | Default |
|---|---|---|
| SKU Prefix | Prefix used when a product’s SKU is auto‑generated (left blank on the product). E.g. SC → SC-0041. | SC |
| SKU minimum length | Minimum digit count of the auto SKU number, zero‑padded. 4 → SC-0041. | 4 |
| Barcode Prefix | Prefix used when a barcode is auto‑generated for a product. | — |
| Barcode minimum length | Minimum zero‑padded digit count for an auto‑generated barcode. | 6 |
| Default Unit | Unit pre‑selected on every new product (drawn from your Units list). | — none — |
| WooCommerce sync qty | When on, every product & variation quantity is kept in lock‑step with WooCommerce stock, both directions. | On |
| Manage stock (default on for new products) | New products — both single and variable — get WooCommerce “Manage stock” enabled automatically, so quantities track from the first movement. | On |
Bulk Stock Tools
Apply stock settings to your entire catalogue in one click (each asks for confirmation first):
- Enable Manage Stock on all products — turns on WooCommerce stock management for every product & variation retroactively.
- Disable Manage Stock on all products — turns it off everywhere and marks everything In Stock (unlimited/untracked). Use only if you intend to stop tracking quantities.
- Sync all quantities to WooCommerce — pushes every SmartStock per‑location quantity total back into WooCommerce in one pass — the fix if the two ever drift apart.
Settings — Contacts
Defaults applied to new suppliers & customers. Contact IDs are auto‑generated and are also assigned to customers created from website (WooCommerce) orders, so every buyer gets a ledger.
| Option | What it does | Default |
|---|---|---|
| Default Credit Limit | Credit limit applied to any new customer that has no explicit limit set — used by the due/credit checks. | 0 |
| Customer ID Prefix | Prefix for auto‑generated customer contact IDs, e.g. CO0001 (also used for website orders). | CO |
| Supplier ID Prefix | Prefix for auto‑generated supplier contact IDs, e.g. SU0001. | SU |
Settings — Orders & POS

| Option | What it does | Default |
|---|---|---|
| Default Sale Discount (%) | Discount pre‑filled on a new POS sale — staff can still override per sale. | 0 |
| Default POS Customer | Customer auto‑selected when the POS opens (typically Walk‑In / Guest). | Walk‑In |
| Allow overselling (negative stock) — POS only | When on, the POS lets you sell past zero stock (quantity goes negative). Off blocks the sale when stock runs out. | Off |
| Enable multiple carts (drafts) | Lets a cashier hold several parallel carts/drafts at once (Cart 1, Cart 2 …) — useful for serving multiple customers. | Off |
| Enable POS discount button | Shows the per‑sale Discount button in the POS totals area. | On |
Automatic Inventory Deduction
| Option | What it does |
|---|---|
| Enable automatic deduction on order status change | Master switch — when on, SmartStock auto‑deducts stock for website/WooCommerce orders instead of you ticking each one. |
| Deduct inventory when order status is | Which WooCommerce status triggers the deduction (e.g. Completed, Processing). Stock is subtracted the moment an order reaches it. |
| Default Business Location | The location automatic deductions draw stock from (unless the order itself specifies one). |
You can always override deduction per order from the WooCommerce order panel.
Settings — Invoice & Receipts
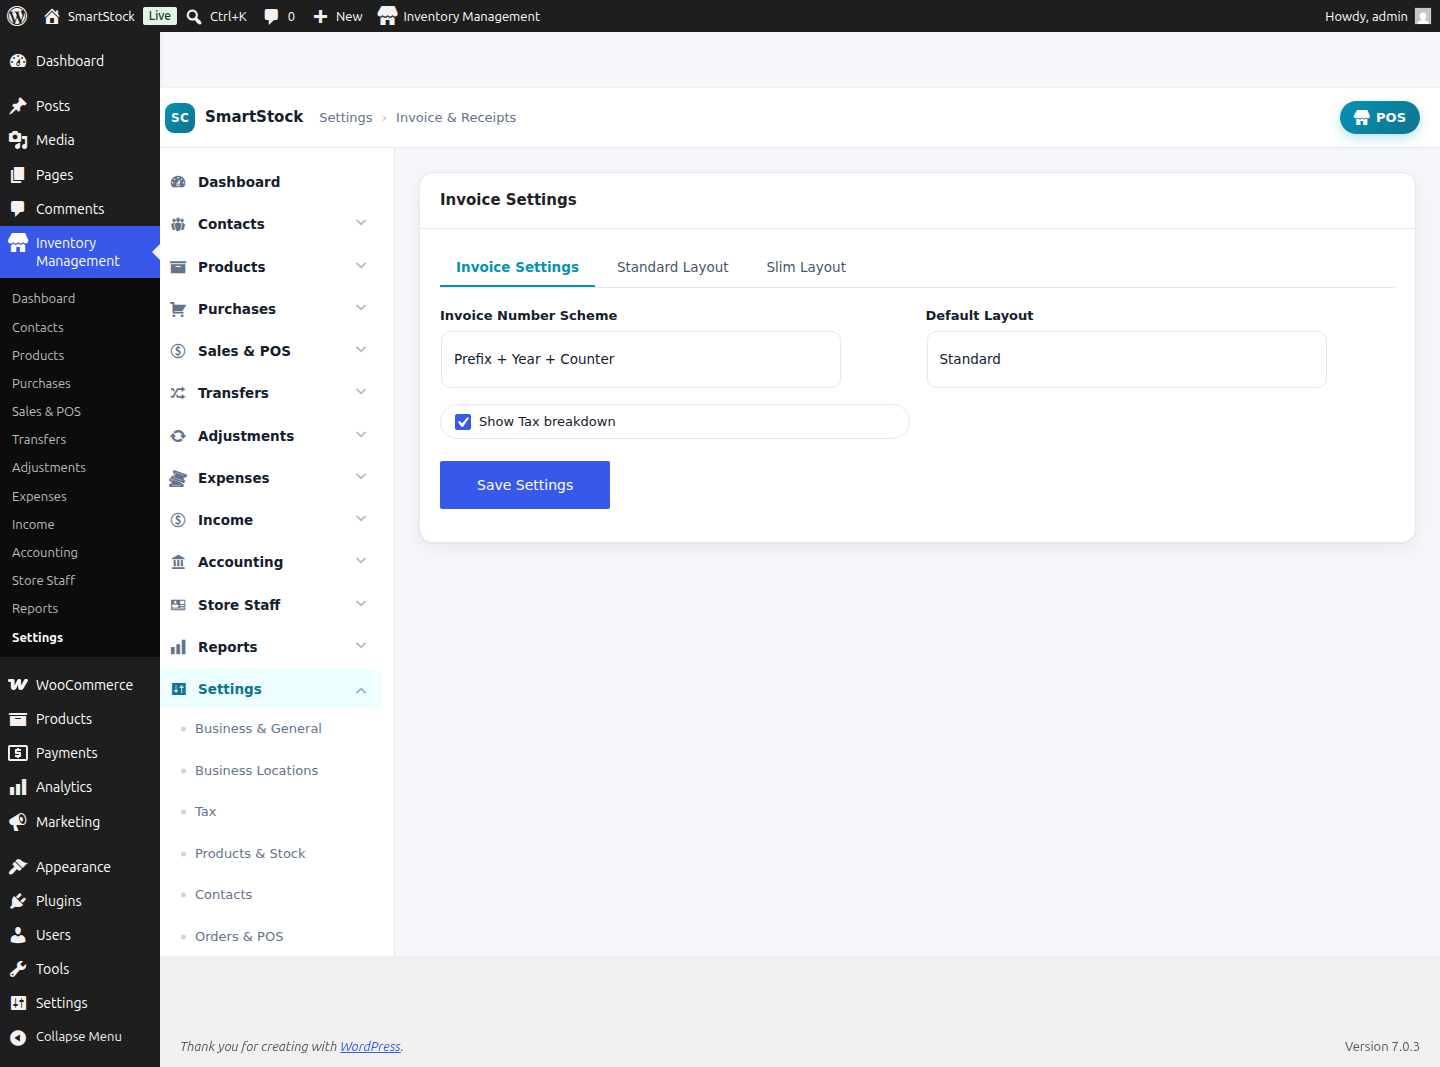 1
2
1
2
- 1 Layout tabs — switch between Invoice Settings, the Standard (A4) design and the Slim (80mm thermal) design; each keeps its own logo/header/footer.
- 2 Per‑layout design — company logo (from the WordPress media library), logo size, custom header/footer text, date format and the full set of feature toggles.
Global invoice options
| Option | What it does |
|---|---|
| Default Layout | Standard (A4 page) or Slim (80mm) thermal receipt — the layout used when printing. |
| Invoice Number Scheme | Prefix + Year + Counter or Prefix + Counter — controls how invoice numbers are built. |
| Company Logo | Pick from the Media Library (or Remove). Rendered at the top of the invoice. |
| Logo Height / Width (px) | Exact logo sizing; width 0 = auto (keep aspect ratio). |
| Invoice Date Format | Date format string used on printed documents. |
| Header Text / Footer Text | Free text above/below the invoice body (e.g. terms, a thank‑you line). |
Feature toggles (Invoice Features → Select All)
Each switch shows/hides one block on the printed invoice: Show Order ID, Show Warehouse Info (from‑location address), Show Note, Show Previous Due, Show Amount In Words, Show Footer Text, Show Barcode, Show VAT Registration Number, and Show Tax breakdown. Everything renders locally — the barcode is drawn self‑contained with no external HTTP calls, so invoices print even offline.
Settings — Barcode & Labels
Defaults for the label printer used by Products → Print Labels. Choose the symbology, the label sheet, what each label shows and how big each element prints.
| Option | What it does | Default |
|---|---|---|
| Default Barcode Type | Symbology: Code 128, Code 39, EAN‑13, EAN‑8, UPC‑A. | Code 128 |
| Default Label Sheet | Sheet layout: 20 / 30 / 32 / 40 / 50 per sheet or Continuous roll. | 30 per sheet |
| Barcode is based on | Which field the printed barcode encodes (the product Barcode, or SKU). | Barcode |
| Show Product Name + font size | Print the product name on the label; set its font size (px). | On / 15 |
| Show Product Variation + font size | Print the variation (e.g. size/colour) on the label. | On / 17 |
| Show Product Price + font size | Print the price on the label. | On / 17 |
| Show Business Name + font size | Print your business name on the label. | On / 20 |
| Show Packing Date + font size | Print a packing/print date on the label. | Off / 12 |
Settings — Reference Prefixes
Every document type auto‑numbers with a short prefix. Change any of them to match your existing numbering scheme — new records pick up the change immediately.
| Document | Default prefix |
|---|---|
| Purchase | PO |
| Sell Return (credit note) | CN |
| Purchase Return | PR |
| Expense | EXP |
| Income | INC |
| Stock Transfer | ST |
| Stock Adjustment | SA |
| Payment | PAY |
| Business Location | BL |
Settings — Email & Notifications
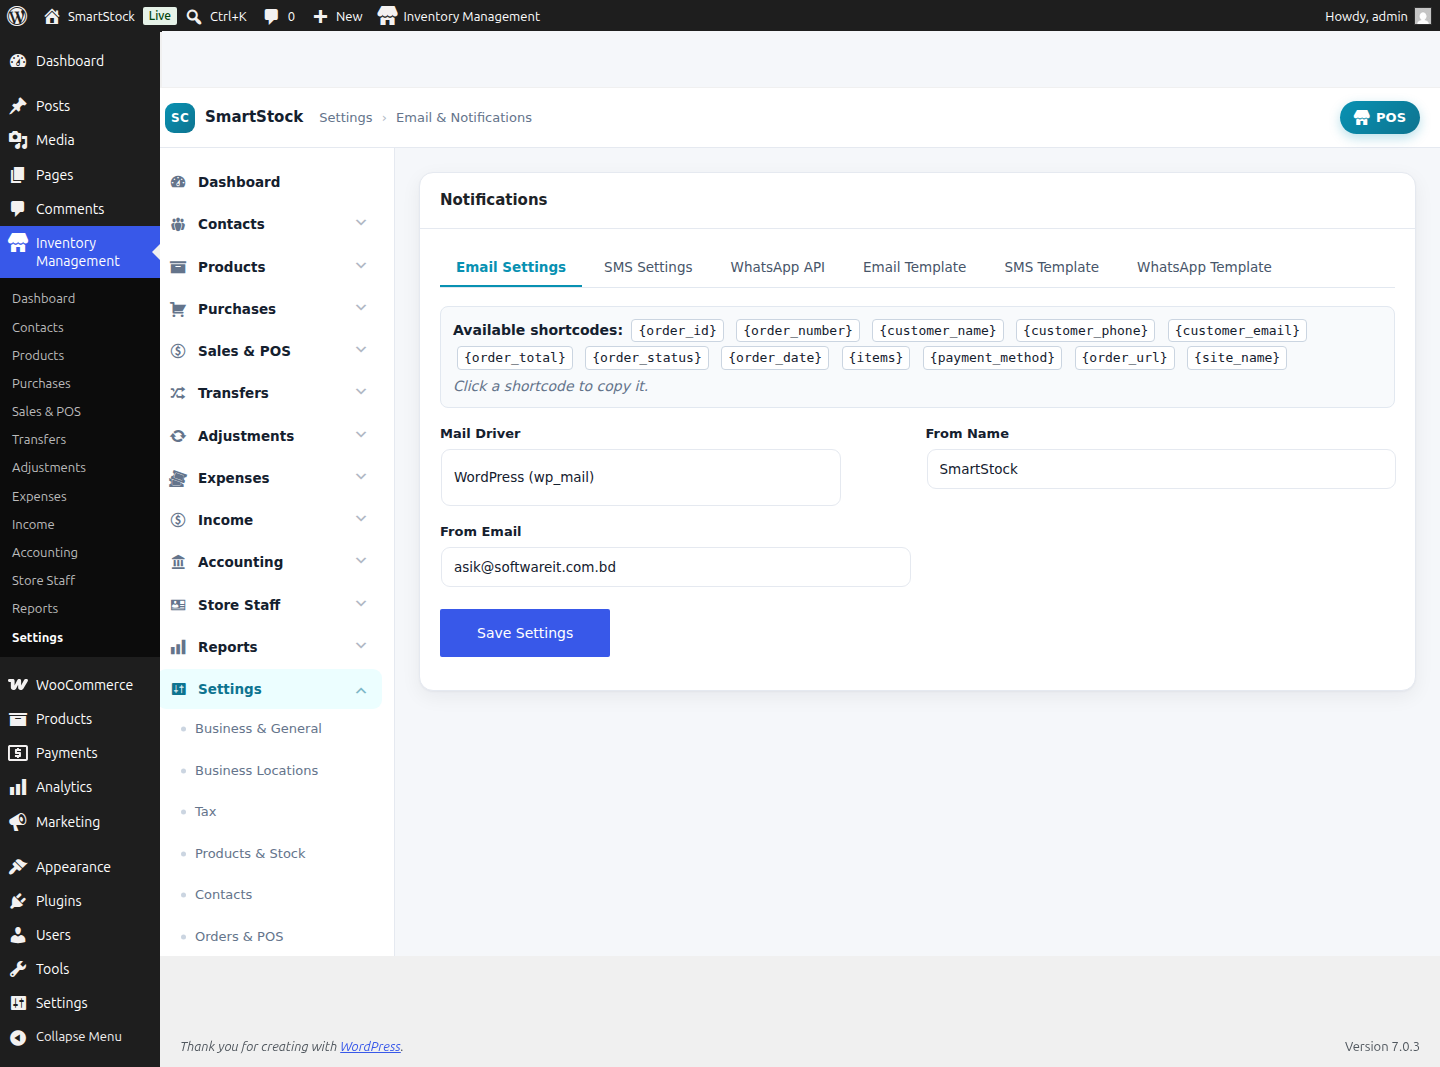
Notify customers automatically on New Order and Order Status Change, across three independent channels. Each channel has its own driver settings and its own message template.
Email (SMTP)
| Field | What it does |
|---|---|
| Mail Driver | Send via the default WordPress mailer or your own SMTP server. |
| From Name / From Email | The sender identity shown to recipients. |
| SMTP Host / Port / Username / Password | Credentials for your SMTP server when the SMTP driver is selected. |
| Encryption | Connection security: None, SSL or TLS. |
SMS
Pick a SMS Provider — Twilio, Vonage (Nexmo), Plivo, MessageBird, Infobip or a Custom Provider — and set the Sender ID / From Number. The custom provider exposes Endpoint URL, Method, Content‑Type, HTTP Headers (one Header: value per line) and a Request Body template, so any HTTP SMS gateway works.
Choose Meta WhatsApp Cloud API (set Phone Number ID + Access Token) or a Custom API (Endpoint URL, HTTP Headers, and a JSON Request Body using the {to} and {message} placeholders).
Templates & shortcodes
Each channel has a New Order and Status Change template. A click‑to‑copy shortcode palette inserts dynamic values such as {order_number}, {customer_name}, {order_total}, {order_status} and more. Email messages are auto‑wrapped in a smart, invoice‑style HTML design; use Preview invoice design to see it. A toggle also lets you attach the sale invoice as a PDF to order emails.
Settings — License
Activate your CodeCanyon (Envato) purchase code to receive one‑click updates and support. The plugin is fully functional out of the box — activation only governs automatic updates and clears the “please activate” reminder notice at the top of the screens.
WooCommerce Order Screen Panel
On every WooCommerce order edit screen, SmartStock adds an Inventory & POS panel: choose the Business Location, tick Deduct from inventory (subtract the ordered quantities), print the Invoice / Packing Slip, jump to Add Return / Customer Ledger, view the order’s payment history and add payments, and see a per‑location stock summary of the ordered products.
Automatic Stock Deduction
Enable it in Settings → Orders & POS. When a website order reaches a selected status (e.g. Completed), SmartStock automatically deducts the ordered quantities from the default (or the order’s) business location — no manual step. You can still toggle deduction manually per order.
PDF Invoice in Order Emails
Turn on Attach the sale invoice as a PDF in Settings → Email & Notifications. Every order email then carries a clean, self‑generated PDF invoice (no external service). Use Preview invoice design to see exactly what customers receive.
Frequently Asked Questions
Do I need WooCommerce?
Yes. SmartStock uses WooCommerce products & orders as its foundation. The plugin will prompt you to install it if missing.
Does the POS create real WooCommerce orders?
Yes — every POS sale becomes a genuine WooCommerce order, so your online reports, stock and emails stay in sync.
Is stock tracked per location?
Yes. SmartStock keeps its own append‑only stock ledger per product/variation/location and syncs the total to WooCommerce.
Can I limit what cashiers can do?
Absolutely — use Roles & Permissions, the POS‑Staff switch, and per‑staff location/account scoping.
Are invoices printable on thermal printers?
Yes — choose the Slim (80mm) layout for thermal receipt printers, or Standard (A4).
Does anything call an external server?
No — barcodes and PDF invoices are generated locally. Only optional SMS/WhatsApp/Envato features you configure yourself use their own APIs.
Support & Changelog
Getting support
For help, open a ticket on our support portal or reach out through your CodeCanyon item’s Comments. Please include your WordPress & WooCommerce versions and a description of the issue.
🛟 Open a Support Ticket 🖥️ Live Demo
Before contacting support
- Make sure WordPress, WooCommerce and SmartStock are up to date.
- Temporarily deactivate other plugins to rule out conflicts.
- Enable
WP_DEBUGand share any relevant log lines.
Changelog
See readme.txt in the plugin for the full version history. Current version: v1.0.0.